Converting a Gen 1 to Gen 2
Kel-Tec's P-32 .32ACP pistol is a fabulous, fun piece of brilliant tooling. It is cheap, reliable, accurate, easy to work on, has inexpensive parts, and provides peace of mind for your pocket with a lightweight 8 ounces.Nearly all P-32s around nowadays are 2nd Generation - the main difference being:
- different grip
- different slide
- different barrel
- different extractor
- different firing pin retention
(The Gen 2 incorporates one of the most ingenious dual-function firing-pin and extractor systems on the market in my opinion. A single hex screw retains the firing pin under spring tension, and at the same time, holds the extractor under spring tension with no coiled spring or plunger mechanism. )
That's about it. Or I thought at first. But the hammer is different! Read on to see how.
Good News and Bad News
The good news is that Kel-Tec, AFAIK, will update your P-32 to Gen 2. You'll basically get a new pistol back, and can enjoy your Kel-Tec goodness knowing you've got one of the best .32 ACP pocket mouse on the market.The bad news is that if you like your Gen 1, you cannot get any replacement parts without scavenging other pieces for parts. Kel-Tec doesn't sell Gen 1 parts.
So what to do if you want to upgrade a Gen 1 and don't want to send it into Kel-Tec?
Well, that's what I did for a quick afternoon project.
Clean Up First
The first task was cleaning up the pistol. It was dirty, slightly rusted, and look liked it had been carried in a work truck tool box or the bottom of a jon boat. A complete disassembly required removal of only two plastic pins, which punched right out, and the lifting and release of the hammer spring from the bottom of the magazine well.As you can see, this Gen 1 was kinda gunked up. Here's the muzzle, which you'll note is quite different from the Gen 2:
The shape of the front of the grip is different, and there is a small retention/guide plate for the recoil spring and plastic rod.
The top of the slide shows another difference (and in this case, a rusted retention firing pin screw:
Assembly of the Franken 32
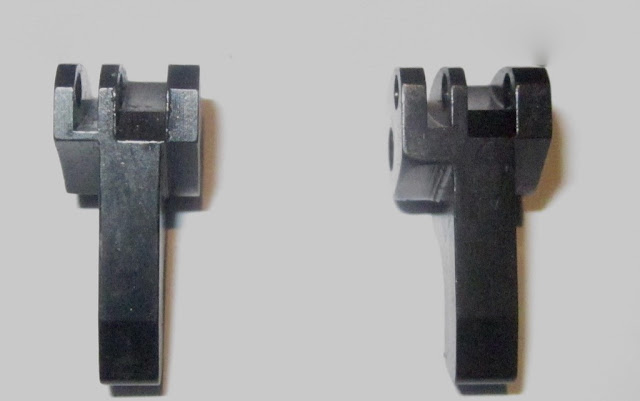
After clean up of the receiver (the only part of the P-32 with a serial number), and other parts - which looked surprisingly good, everything when smoothly until it was time to check function - the hammer wasn't cocking, and i thought for sure that everything was kosher.It wasn't! Here's why (I think): not only is the hammer different on the Gen 1, but also the hammer block inside the grip. Here's a comparison of the Gen 1 hammer and a brand-new Gen 2 hammer:
See the difference? Here are some measurements. First the width of a Gen 1:
And now the width of the Gen 2:
So, different hammers. Hmm... Perhaps due to the Gen 1 hammer I tried, it would not 'mate' with the Gen 2 hammer block in the grip? Well, I thought "Why not just just put a new hammer in?"
Well, fortunately I had a spare P-32 hammer on hand - cheap enough part, so why not? Installed it after driving out the small roll pin holding the hammer spring on the old hammer, then reassembled, installed, and checked function.
 It works! So now I have an upgraded Franken 32!
 Conversion Range Report
Well, it looks like I have another P32 in the stable. This one will be a 'beater,' and is also going to get a trigger upgrade. I'll also replace the trigger bar (small spot of rust on it, and for $4 for the part, not a big hit to the wallet - these pistols are @wesome!)Went to a local range and ran a half box of GECO using a variety of magazines. No malfunctions. I think the results are pretty good:
RTK Trigger Install Tips and Traps
To finish off the conversion I installed a spare RTK trigger. Be warned however: You will have to smooth away adequate clearance for the front of the trigger ball in order to achieve a reset. This means you'll be forever modifying the Gen 1 receiver. Since this is a 'beater' P32, I didn't worry, and view this project as a learning experience.After I got the trigger reset working, it was a simple matter to adjust the over-travel - after the hammer spring was installed. I think I like the results and will give this little pistol another run at the range on my next outing:
Range Report with RTK Trigger
Got out to the range this morning and ran a full box of GECO .32ACP FMJ through what I now call my "Franken32," or just "Frankie" for short.:-)
No malfunctions, no problems, and 100 percent reset following trigger pulls. For me, the RTK trigger provides a more comfortable seat for my index finger.
I think I like the results:


No comments:
Post a Comment