Wednesday, December 12, 2018

Review: Ruger Charger Takedown, Whistle Pig and PMACA

The Ruger Charger has been around for a while. Some folks didn't get the pistol's concept at first, but those who know about the Charger know that it is a really nice and accurate 10/22 in pistol form. And because it is a pistol, you can configure your Charger to the way that works for you, much like the entire 10/22 platform.

My new range toy is economical, convenient, and a pleasure to shoot.

Here it is:


Well, what's in the bag is the toy:


Gun parts? Well, kinda:


But conveniently packed and then unfolded:


This is a Charger in the factory configuration, but sporting a Copper Custom adapter, a folding adapter, and an SBA3 pistol brace. Here's the magic that makes this happen  - a Leapers UTG folding adapter - not really for heavy duty weaponry, but fine for rimfire sporting (on a PMACA chassis):


Decent accuracy at 25 yards, and I'm sure that with a bit of tweaking and a higher-power scope, you could be hitting quarter-sized groups out at 100+ yards. This Ruger Charger Takedown is very comfortable with its pistol and arm brace. I use the bipod folded down as a foregrip.

Here are some results using Aguila SV at 25 yards with a Bushnell TRS-25 red dot:


I also recently finished a build of a new pistol (thanks to SAPOutfitters for a stripped receiver) using a PMACA chassis and KAK Shockwave brace:


Even better, I just got in a new item for my PMACA Charger. How do you make a pig whistle? Use a Whistlepig barrel:

Well, not really a WhistlePig barrel, more properly deemed an Acculite barrel. This is a 10" fluted  and threaded barrel. It is aluminum with a steel sleeve and weighs about 10 oz. According to the company, some break-in is required, with cleaning every 25 rounds for the first 100 rounds, so I made sure to take some CLP and bore patches with me to the range. One nice thing about 10/22 Takedowns is the ease of cleaning. Much easier than breaking down an automatic pistol or revolver!

The Acculite barrel does not come with a Takedown locking mechanism (usually available for $50 or so as parts), so the first job was to remove the old mechanism on the factory blued barrel, You must depress the locking plunger, then at the same time pull the plunger pin - being careful not to let the plunger fly out, as it is under pressure. You can then access the 9/64ths hex button-head short bolts holding the mechanism to the barrel. Reassembly is the reverse, and I made sure to put blue Loctite (242) on the short bolts:


I probably wouldn't over-torque the bolts, as you may strip the aluminum threads (I wonder how many folks do that with these barrels?). The result is a nice looking package:
Note however: The Acculite barrel will not fit the standard Ruger Charger Takedown poly stock.

The barrel will not fit the Ruger Charger Takedown poly stock.

Fortunately, the PMACA chassis supports standard factory taper and bull barrels with no problem. The results are pretty good, IMHO. I used Aguila Super Extra SV and CCI SV LRN rounds to break in the barrel:


I look forward to lots of fun range time with my 'new' Charger Takedown pig whistler!

Absolute Cowitness on the Ruger Charger Takedown

It took a few purchases and range sessions, but I now have absolute cowitness on the Charger TD. The elements are:

Bushnell TRS 25:


UTG Sub-compact rear sight (which has its peep hole drilled out a bit larger, using a bit chucked in a modified exacto blade pen handle):

NDS (Nodak Spud) 23 .920 front sight (use SKS adjustment tool):

and of course, the Whistlepig Acculite 10" barrel. I had to do a bit of sanding to slide the NDS front sight onto the Acculite's threaded crown protector, which is tightened down on a Viton o-ring. The UTG sight was raised to its uppermost elevation. The NDS sight post was brought down a few turns. The pistol was first sighted in using the TRS 25 red dot. Then, the red dot was removed and the pistol was sighted in starting at 30 feet. Amazingly, elevation was perfect, but windage was off to the left. So after a few turns on the rear sight (the UTG has elevation and windage adjustment!), the target was sent out to 25 yards, then tested again.

After confirming the iron sights, the red dot was re-attached and several round-robins were done on the target with the red dot nestled just below the tip of the front iron sight:

I like the results! This is what the pistol looks like with the SBA3 brace extended:
This is what the pistol looks like with the brace folded. Note that the left-hand fold allows use of the pistols charging handle and access to the safety and magazine release:
And for a nice compact storage in a range bag, the pistol - being a Takedown model - packs away nicely:
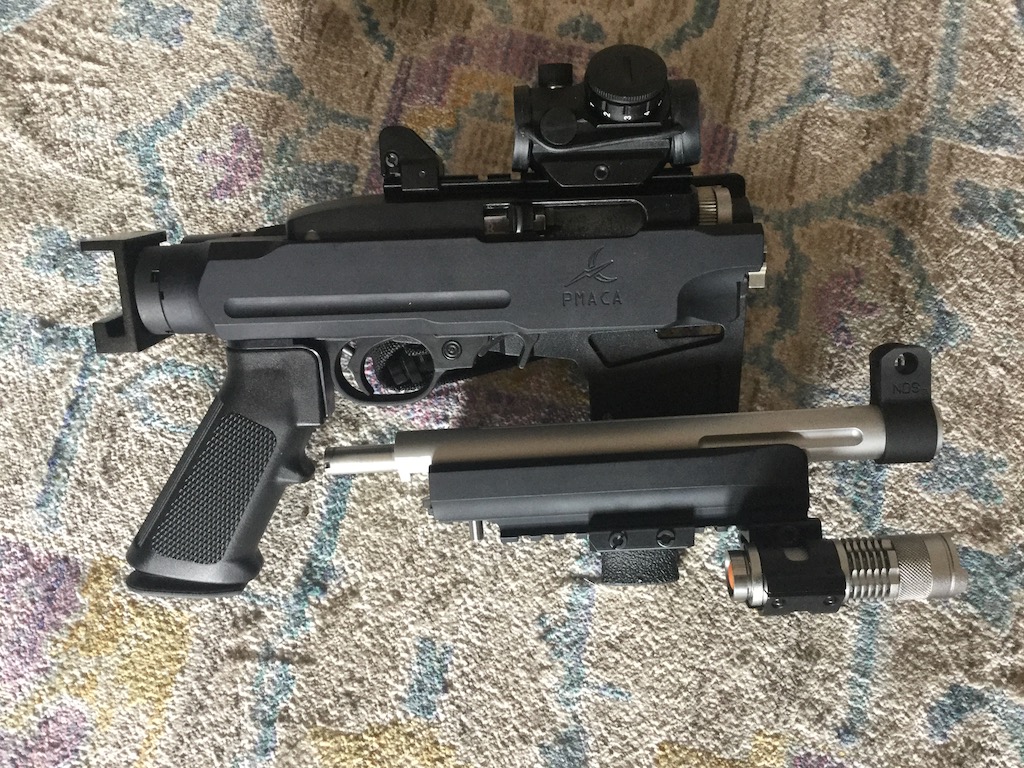
Note that i also put on a Missouri Tactical Products LLC A2 Pistol Grip Plug for AR/M4 - AR-15 Stowaway Pistol Grip Plug (~$8) on the end of the grip to hold a spare 2032, hex keys, etc.), along with a LED flashlight and a Blackhawk rail mounted thumb rest.

Cheap Bolt Buffer

Some folks think that a third-party bolt buffer can make the 10/22 a tad quieter to shoot instead of the 'clack-clack' of the factory steel buffer. But there was no way I was going to pay $10 or so to get one when I could just get a foot-long stick of Delrin 150 and make my own - you can find 'em on the 'zon for less than $7 at the time of this writing, which is enough to make at least nine 1.25-inch by 1/4 buffers. I cut them with a Dremel, then slightly chamfer the edges.

The mechanical properties are enough to support use as a buffer:


Finally!

Finally acquired the Charger that I originally wanted. Looks like TALO pushed out some more stainless versions with the varigated green stocks. Honestly, I'm not really thrilled with the stock, but will probably keep it. My biggest beef is that it isn't milled out to accept a Copper Custom adapter. I contacted Copper Custom and they said they would mill it out and include an adapter for $150. No thanks.

But I am quite pleased with the accuracy out of the box. Here are the first 15 rounds via the included Ruger 15-round magazine (after sighting in at 25 yards; btw, a laser bore sight can save a little time and effort):


And here's the latest target using my tried-and-true Charger in blue, shooting a 25-22-25-25 (25 rounds of .22LR at 25 yards in the space of 25 cents):


Tuesday, October 9, 2018

Ruger 10/22 Stainless 16.4" Takedown

Plinking on the Cheap

Brought home a new compact plinker the other day. It's stainless and plastic and comes with a nice carry bag and a 25-round magazine. This is what it initially looked like after adding a Simmons 3-9x variable scope with Weaver 1" Quad-lock rings:


This page documents my experience with my new Ruger 10/22 Takedown (Model 11125, a 'Davidsons' special). Out of the box the front sight was not tightened down in its dovetail, the barrel nut was not adjusted, and the takedown hex bolt was not tightened - always, always check out, clean and adjust your new weapons before heading out to the range!

One of the most important things to do for the Takedown is to properly adjust the barrel tension to the receiver. To see how to do this, browse to:

Click on 10/22 "Takedown Features"

Starting at the 2:06 mark in the video, you'll see Ruger's official method. You can also check the 10/22's manual:

Ruger 10/22 manual

Warning: Ruger's FAQ is INCORRECT


Interested in taking off your flash suppressor-equipped 10/22? Don't follow Ruger's advice. I'm out of pocket almost $10 after reading this:


It's not true. It won't work. And Ruger's guilty 'cause you can't acquit if the bit won't fit!

I emailed Ruger customer service about this FAQ and got a response in less than 24 hours:

 The answer is that is, apparently, this particular model Ruger (11125) has a flash suppressor that does NOT take a T-60 Torx, but instead requires a 3/4" wrench on the flats for removal. So save yourself some money, folks. I initially figured the Torx would be less problematic, but apparently I now must use a wrench.

Tip: Kel-Tec's 9mm Sub-2000 thread protector works great on the threaded 10/22 Takedown barrel:

s2k-532-9 thread protector (black, $10)

10/22 Ammo Test


Here are some initial results of my new 10/22 Takedown's first run, using nearly 300 rounds of a variety of rimfire on hand to test rifle and magazine function. I used a brand-new 10-round (clear) magazine, a brand-new 25-round BX-25 magazine included with the rifle, and a used dual BX-25 magazine purchased at a LGS. The 10/22 was cleaned before heading out. I didn't mess with the magazines at all:


Based on my limited experience, I at first could not use CCI SV (at first the ammo was unable to cycle the bolt; this changed after a 400-round break-in). I don't recommend Armscor for the 10/22. The Armscor had a number of failure to feeds (cartridge incompatibility or deviation? It's cheap stuff).

Federal's American Eagle rimfire was inconsistent with a failure to eject. Two surprises were the acceptable performance of the least expensive rimfires: Aguila SV, currently about $0.05 per round, and Remington Golden Bullets, purchased locally from Wally World at about $0.045 per round.

CCI's mini-mag 'Swamp People' worked fine (but is inconsistent for target fun) and CCI's 100-round box mini-mag 40-grain also worked well.

All four magazines functioned perfectly. I knew better than to try using the extended magazines as a support grip, although it would have been wonderful had Ruger designed the receiver, catch, and magazines to do that.

Update: Ran another 150 rounds - 100 Fiocchi and 50 Aguila SV. No malfunctions.
Update: Ran another 200 rounds after purchasing three rotary and five additional BX-25 magazines - 150 CCI SV, which worked great, and 50 Aguila SV. Two of the 25-round magazines had numerous failure to feeds. Otherwise four 25-round magazines, four 10-round rotary mags, and my single dual-25-round mag had no problems.

The BX-25 Magazine


Extended magazines for the 10/22 elicit a lot of online bandwidth. Some folks love 'em and some folks hate 'em. Makers of magazines for the 10/22 seem to come and go over the years. The gamut of opinions and problems and solutions seem to run to:

1. The rotary magazine is the best, most foolproof mag for the rifle. The problem is that it is not extended, and only comes in 1-, 5-, and 10-round variants, clear and black.

2. Don't bother with any extended magazine except for Ruger's BX-25, the rest are crap. Well, I can't say, as I don't have any third-party mags, but I've read plenty of stories about problems.

3. Some BX-25s work great, while others don't. I'm in this camp, and out of six BX-25s and one dual BX-25, one BX-25 is giving me trouble.

4. The problem with misfeeds is the feedlips.

5. The problem with misfeeds is in the interior channels for the follower and rounds.

6. The problem with misfeeds is a loose follower. One purported fix incorporates a .22 short round to help ammo feeding:

Buck22 mod

7. The problem with misfeeds is a weak stock magazine latch, fixed by using a stronger spring, included with a product such as the KIDD Magazine Latch Plunger, in Stainless Steel and the 2nd spring option, which is interchangeable with the installed standard spring. Other springs in a similar diameter and length but stronger compression are available at Ace Hardware - I found a couple locally for $0.60 each.

8. The problem with misfeeds is a loose magazine, as the extended magazine is not held as tightly as the rotary models. The supposed fixed is tape affixed to the rear of the mag head or using metal-powder epoxy to build up the rear of the mag head and make the mag a tighter fit. The epoxy fix is destructive and voids your warranty.

9. Tape the offending mag to a target board and shoot the piss out of it (using one or more rotary magazines)

Use Logic to Troubleshoot 10/22 Problems!


If your 10/22 is not running properly, use logic to solve any problems, such as accuracy and feeding issues.

1. don't change parts willy nilly... stick with stock parts and then only replace one part at a time
2. the majority of feeding issues are due to magazines
3. don't use the BX-25 or any extended magazine as a rifle support or as a hand grip
4. if the rifle functions perfect with a 10-round rotary mag and some, but not all BX-25 mags, then it is the particular magazine
5. ejection failures can be due to dirty ejector/bolt; a cheap fix is a new ejector
6. stove pipes can be due to ammo type, dirty actions or a flawed ejector
7. failure to fire can be due to dirty action, dirty bolt or firing pin
8. label your multiple magazines and track performance to find functioning ones vs problematic ones; only then start playing around with the problematic magazine
9. rotary mags are more dependable and forgiving than extended magazines
10. IMHO, 100- or 110-round drum mags are gimmicky, but hey, that's like my opinion, man.
11. as a last resort, call Ruger customer service; and if your 10/22 has to go back to the mothership, don't send your rifle back w/3rd-party parts.

Magpul X22 Backpacker


I ordered a Magpul X22 Backpacker stock from Brownells. It came with three 10-round mags for $128 shipped, which I thought was reasonable. I also obtained a BX trigger for $49 from Brownells and installed it, along with a bolt slingshot-modified part. More to follow.

JWH Bolt and Charging Handle


Snagged a deal from JWH for a scalloped bolt, captive firing pin and extractor assembly - also included was a nice charging handle. Alas, it has a captive spring; fortunately I have a Kidd charging handle w/three different springs on hand - will be testing to see if a lighter spring will let me run CCI 'quiet' rounds.

Overall


I'm pretty happy with my new 10/22 Takedown (Model: 11125). It came with a nice bag, different from the other models in that there are not outside pockets and large, red Ruger logo - only a simple velcro patch - quite classy and stealthy. Inside are moveable velcro 'cups' and straps to arrange how you'd like to arrange your gear, along with padded 'ears' folding over three large pockets.

I did find that the factory sights (which I can barely see at my age) shot a bit to the left (will have to drift the rear sight a tad). So I ordered a 'see thru' scope base and an inexpensive Simmons silver 4X scope to match my 10/22. Here's a target from a recent outing using Aguila Super Extra HV and the Simmons 3-9x scope:


Simmons Scope Removal and Reattachment


I removed the scope when I swapped the Ruger TD stock for the Magpul X22. With fingers crossed, I re-attached the scope in the same position, then went to the range and ran the first 10 rounds using CCI standard velocity (1070fps, 40-grain LRN) through a clear rotary mag. I made sure to first cycle the bolt several times before loading the magazine.
After a couple deep breaths, here are the results:


I look forward to getting better acquainted with this plinker. Today's outing was another fun test.

Hope this helps some folks out there contemplating this rifle. I'm sorry I waited so long!


Wednesday, August 15, 2018

Review: Charter Arms Pitbull 9mm


Charter Arms Pitbull 9mm


Some folks think Charter Arms has gone to the dogs - a long time ago. However, I recently went shopping for a pitbull and found one in 9mm:


This unique revolver is the only one currently on the market (AFAIK) that does not need a moon clip to hold the 9mm rounds. There were other previous designs that provided the same feature though, such as the S&W 547.  An interesting extractor system uses small metal tabs to hold each round in place and later extract the spent shell:

As you can see (using my snap caps), the cases are raised (or in the real world, extracted downwards) using pressure on the extractor rod:
I had no trouble extracting spent shells. Accuracy was pretty good, and I like the single action of the revolver:

Initial Problems

Unfortunately, the revolver exhibited intermittent light strikes and occasional trigger lockups. It is headed back to Charter for a fix. Also, there was crude grinding of the crane by the ejector rod. This was disappointing, and I wonder how this passed muster:

Here you can see the grinding of the crane and just how close to the ejector rod the metal was shaved:


  Hopefully Charter will resolve these issues... I was most concerned about the light strikes and intermittent lockups than the crane.

Update: Received a FedEx shipment notification that the Pitbull has [purportedly] been fixed and is on its way back. This means that the revolver spent only three business days at Charter for repair. It will be interesting to see what returns.

The Fix and Return

 When I opened the return box, my Pitbull was encased in bubble wrap and there was a work ticket with the following:

I'm not sure what was really done. Of course I had to clean my Pitbull before taking it out for a test spin. Starting the cleaning process, I removed the grips first. Inside I found a bit of grinding dust:

This is unprofessional, but I can't fault Charter too much, as I found some loose burrs/shavings inside my SP101 too. What is happening to the gun industry? Too much work, too few gunsmiths? I've also read some nasty stuff about Ruger's out-the-door factory QC, too - with pictures of 10/22 barrels lacking extractor channels!

The 'new' crane was different, but still looked more like a retrofit than an engineered part. Perhaps Charter didn't do a proper re-design of the gun following the move from six to five chambers, and is using cranes from other models to work with the 9mm Pitbull?

Anyway, I was relieved to see more material supporting the cylinder on the ejector rod. I'd love to see some pics of the cranes of Pitbulls from other owners:


Range Test

So, with some trepidation I took my 'fixed' Pitbull to the range. Looks like any fear of an ineffective fix was unfounded. I ran 100 rounds of Winchester whitebox and 50 rounds of FMJ reloads with no problems:


As you can see, the crane is cosmetically good looking from the outside. I had zero problems with trigger lockup in slow double-action, all single-action rounds fired, and only one light primer strike out of 150 (most likely due to variation in cartridge seating/fitment/length).

I should also mention that the trigger seems smoother and lighter than before. This could be my imagination. I don't have a trigger pull measurement tool (could jury rig something I suppose). But the range experience seemed a lot easier than before the 'fix.' 

My faith in this revolver is somewhat restored. It's now in the break-in phase, and I'll be running hundreds of rounds through it over the next couple months. Cheap shooter - it is a nice complement to my Belgian-made Browning Hi-Power target pistol.

Tip on Cylinder Problem!


And here's the latest from some close-in double action:


The Pitbull continued to work great, but towards the end of its latest 150-round session, the cylinder became increasingly harder to open. Eventually almost impossible in fact!

Here's the problem and the solution: Take a look at the diagram, and you'll see part #14, listed as "Cylinder Latch Release Screw":

The diagram isn't the best (looks like something from pre-digital days), but here's what the screw looks like:


The problem for me was that the screw (after my Pitbull came back from factory repair) was screwed inward too far - the screw needed to be backed out just until the head was flush or just a hair at the surface of the back of the frame.

If the screw is in too far, the cylinder latch cannot function properly to release the cylinder. My guess is that if this screw is in too far and you are unable to release the cylinder, you'll have to remove the crane screw and cylinder to get at this cylinder latch release screw (which is also used to enable removal of the cylinder latch for service).

Once I made the screw adjustment, with the cylinder latch release screw *just* flush with the frame's surface, the cylinder latch release functioned normally. I will keep my eye on this adjustment - I'm not sure that some blue Loctite is called for, but we shall see!

I guess the moral here is to always check your revolver's screws, such as crane screw, hammer pivot, cylinder latch and cylinder latch release screw! Vigilant maintenance is key!

Sunday, July 15, 2018

Review: Charter Arms Undercover .38 Special Hi-Polish


Tips, Tricks and Traps of the Charter Arms .38 Special in High Polish Stainless

This review is for a new addition to my pocket pistol stable - a Charter Arms Undercover .38 Special in a high-polish stainless steel. My other Charters are a Pathfinder in .22 magnum - that pistol is extremely accurate for a snubby and has run perfectly for more than 300 rounds so far; a Charter Pitbull 9mm, which after a trip back to the mothership runs great; and a nicely accurate Charter Pitbull .380ACP.

I have a number of other revolvers, such as an early Smith & Wesson Safety Hammerless from the early 1900s, a Smith & Wesson .38 Special snubby from the 1950s, a Ruger SP101 .22LR, two Ruger SP101 .357 magnums, another Charter Pitbull in .380ACP, and one of the later Smith & Wesson kit guns, the Model 317, version 3 - with the insipid internal lock which I removed and plugged up right away.

The Undercover Model

Charter offers multiple variants of the Undercover model in .38 Special, both standard weight and lightweight alloy. I really wanted a .327 model, but couldn't pull the trigger on a model named 'Undercoverette.' Charter currently lists the following Undercover models, all 5-round with the exception of the Police Undercover:

13811 Undercover, Blue DAO $ 352.00 (blue colored)
13820 Undercover, Blue Standard $ 346.00
13825 Undercover Tiger, Tiger & Black Standard $ 404.00 (striped)
23830 The Gator $ 424.00 (patterned)
23872 The Old Glory $ 462.00 (red, white and blue-themed)
63820 Undercover, Blacknitride™, $379 (nitride coated)
73811 Undercover, Stainless DAO, $364 (bead blasted)
73820 Undercover, Stainless Std, $358
73824 Crimson Undercover $ 577.00 (red colored)
73840 Police Undercover $ 390.00 (bead blasted, 6-round)

However, my Charter, in highly polished stainless is:

73829 Undercover, Stainless, High-Polish $379

Note that most of the revolvers fall under four Franklins. This is a good deal. But what don't you get?

- tight fit (close tolerance) and finish
- polished surfaces (except for High Polish models)
- quality hand-finishing and fitment parts
- an insipid internal lock
- a high price tag

According to Charter, other features include:

1-pc barrel/lug/sight
8-groove button rifled barrel
Protected ejector rod
3-point cylinder lock-up (whatever that means)
Ergonomic trigger does not pinch finger (this is true; i *hated* the Ruger LCP)
Barrel is threaded into frame (not pinned?)
Full hammer block safety system (don't all revolvers have this nowadays?)
Quick lock time (whatever that means)
No side plate (yep, all innards slide into or up into the frame)
No cylinder stop to interfere with reloading or speed loaders (not really true, as you'll see)

A Closer Look at the High-Polish Undercover

The revolver comes in Charter's standard plastic, foam-lined box with assorted papers and an insipid trigger lock to satisfy the lawyers. You'll get a set of standard 'old school' wood grips instead of the rubber grips for most of the Undercover models.

The polish covers all of the exposed parts of the revolver, such as the outward face of the crane, trigger, strap, slide latch, and screws:
The polishing is most evident on the right side of the revolver, with its bare expanse of metal. But when you look closely, you'll see that although highly polished, the polishing did not remove all manufacturing marks. This is evident all over the revolver and quite frankly, I expected as much considering this revolver's price point - but it still looks great!

Of course, one of the first things I did was paint the front sight with a daub or two from my Wally World lime-green acrylic pen (you can get 'em in the fabric section):
A few other details, such as the shrouded ejection rod:
And the 2" barrel, where you can see the bit of metal not entirely polished. I didn't find it to be objectionable, and it's really not that noticeable:

Finally, the trigger, which is much like the trigger of my .22 magnum Pathfinder, but with a nice polish. The frame, unlike the polymer frame of the Pathfinder, or the alloy frame of the other Undercover models, is of polished stainless steel - this is a bonus in my opinion:
So the revolver looks good, but how does it shoot?

Range Report for the High-Polish Charter Arms Undercover

Took my new high-polish pocket revolver out to the range and ran a box of .38 Special FMJ FN. The first target was single-action at 12 feet. The initial cylinder determined that the revolver was shooting low, so this target was with the sight picture at the top of bullseye:

I think I'm pretty happy with the results. It is possible that the revolver may shoot higher with more powerful loads, but I like the ammo I'm using - reloads from a couple guys at Hyperion Munitions (support your local munitions makers!).

Next, I tried some double-action, but a yard closer:
Not too hard to keep on the sight picture. I like the way this revolver handles, especially with the range ammo I'm using.

Speed Loaders and Loading Block Box

It's nice to have speed loaders, a loading block and storage for hitting the range. This keeps everything tidy on the range bench for me. Like the HKS speed loader modification I had to perform for the Pathfinder, I also had to modify the HKS-36A speedloader to work with the wood grips on the Undercover.

If you get a 5 Star J2 speed loader, which is milled aluminum, unlike the plastic HKS speed loader, you'll find it works 'out of the box' with no problem - albeit at a cost of 3X the HKS. For the loading block, a Makerspot 5-round square milled aluminum block provides a nice match for the J2 speedloader at a price of about 1/3rd the 5 Star versions (which have a large, prominent logo milled/lasered on the face, which I don't like). Everything fits, including a spare tray cut from a box of .38 Special factory ammo, neatly inside an $8 Outdoor Products weather-tight box from Wally World:

The rounds are reloads (which i've marked as heavier than normal, using a red Sharpie on the primer). A couple sheets of cardboard raise the level of the tray and block so that rounds are keep neatly inside and won't fall out during transport.

The only problem with using the speed loaders and loading block is that it makes shooting so fast and easy that a box of ammo disappears quickly!


I'm having a lot of fun with this revolver! Charter Arms also sells a $25 hammer for converting your Undercover (and other revolvers) to double-action-only. It's stupid simple to replace the hammer:

1. remove grips
2. slightly cock hammer
3. insert paperclip end into hole in hammer spring guide
4. remove hammer spring assembly
5. unscrew hammer screw (just below cylinder release latch)
6. slide out old hammer
7. insert new hammer and re-assemble

I like my Undercover configured this way, and it only took a little work to polish up the new spurless hammer to match the high-polish finish of my revolver: