Thursday, August 25, 2016

Best MicroSDHC for Beaglebone and Raspberry Pi

yep, here it is:


don't waste your money on lesser or more expensive brands... i have used these for months on end, even in an RPi3 running 24/7, and have yet to have one fail... Sandisk? Transcend? Kingston? ackpht! i have had failures with all those...

also, make sure not to get burned on counterfeits - Asian scum have infiltrated the manufacturer and distributor chains at Amazon and mom-and-pop cellphone stores...

that said, i can generally find these for US$10.99-$12.99 at a local box-mart electronics place with the initials 'bravo bravo' (you know who i'm talking about, right?)

UPDATE: finally, after more than two years' uptime, my sdhc shit the bed after a power surge here at the casa - always, always keep an update/copy on hand - cheap insurance - it was my internet radio/music server/thermal printer and i was able to get back up to speed in less than two minutes!

Ultimate Cheap Desktop Computer


here's the ultimate cheap desktop computer - i attached this to a $9 LCD monitor from a local thrift store for quick computing...

why?

because i can!

Raspberry Pi Zero (1.3)
$5 USB sound card
$12 Ableconn HDMI->VGA adapter
junk box Belkin wifi adapter
junk box 4-port USB hub
scrap piece from a crappy RPi case

works great!

Monday, August 22, 2016

Logging BME280 Weather Data

LATEST UPDATE: a replacement bme280 has been installed and has been running with no problems for a day or so; the 'failed' unit apparently came back to life and has been running inside with no problem - one unit reads 10 percent too high on humidity - i'm wondering if these aren't Bosch Sensortec units?

UPDATE: the bme280 sensor FAILED after four hours of use and queries on one-minute intervals; i'm disappointed, but may try another one to see if it was an anomaly (hey, shit happens, right?)

fortunately, i had a spare bmp180 on hand, and have put that into use instead - we'll see how it holds up... i'm sure i'm not the first n00b to run across sensor hardware failures  - i've even seen pictures of a bme280 melted from what i can only assume is an over- or reverse-voltage run...

:-)

just spent a bit of a morning crafting a logging script to read bme280 sensor data... the file has a format like this:

2016-08-22 12:17 78.80 30.14 52.60
2016-08-22 12:17 78.33 30.14 52.57
2016-08-22 12:18 78.28 30.14 52.56
...
  
the bme280 is an interesting sensor that returns temperature, barometric pressure and humidty...

HOWEVER, many users report that the temperature runs about 4F higher than that reported by most other sensors... and i found this to be true, as i gauged the bme280's temp readout against a bmp180 and an LCD digital thermometer... in light of this, i've included a 4-degree 'correction' in the conversion code in the script - just so you know why

i installed the lighttpd web server on a Raspberry Pi 2, with the sensor attached and fed out to the side of the garage... the script logs data once a minute (the log will grow to 50MB over the course of a year)... current weather info can be retrieved via a simple one-liner shell script:


#!/bin/sh
# retrieve weather info from data log
# 3 - temperature
# 4 - barometric pressure
# 5 - relative humidity
curl http://192.168.1.20/weather.txt -s -d ascii | tail -1 | cut -f $1 -d ' '


here's the logging script in Python:

#!/usr/bin/python
# version 0.1 - bme280 data reader and logger
# 082216
# added 1-minute logging
#
# data fields:
#     DATE         TEMP  BARO  HUMID
# YYYY-MM-DD HH:MM TT.TT PP.PP HH.HH

import smbus
import time
from datetime import datetime
from ctypes import c_short
from ctypes import c_byte
from ctypes import c_ubyte

DEVICE = 0x76 # Default device I2C address

bus = smbus.SMBus(1) # Rev 2 Pi, Pi 2 & Pi 3 uses bus 1
                     # Rev 1 Pi uses bus 0

def getShort(data, index):
  # return two bytes from data as a signed 16-bit value
  return c_short((data[index+1] << 8) + data[index]).value

def getUShort(data, index):
  # return two bytes from data as an unsigned 16-bit value
  return (data[index+1] << 8) + data[index]


def getChar(data,index):
  # return one byte from data as a signed char
  result = data[index]
  if result > 127:
    result -= 256
  return result

def getUChar(data,index):
  # return one byte from data as an unsigned char
  result =  data[index] & 0xFF
  return result

def readBME280ID(addr=DEVICE):
  # Chip ID Register Address
  REG_ID     = 0xD0
  (chip_id, chip_version) = bus.read_i2c_block_data(addr, REG_ID, 2)
  return (chip_id, chip_version)

def readBME280All(addr=DEVICE):
  # Register Addresses
  REG_DATA = 0xF7
  REG_CONTROL = 0xF4
  REG_CONFIG  = 0xF5

  REG_HUM_MSB = 0xFD
  REG_HUM_LSB = 0xFE

  # Oversample setting - page 27
  OVERSAMPLE_TEMP = 2
  OVERSAMPLE_PRES = 2
  MODE = 1

  control = OVERSAMPLE_TEMP<<5 | OVERSAMPLE_PRES<<2 | MODE
  bus.write_byte_data(addr, REG_CONTROL, control)


  # Read blocks of calibration data from EEPROM
  # See Page 22 data sheet
  cal1 = bus.read_i2c_block_data(addr, 0x88, 24)
  cal2 = bus.read_i2c_block_data(addr, 0xA1, 1)
  cal3 = bus.read_i2c_block_data(addr, 0xE1, 7)

  # Convert byte data to word values
  dig_T1 = getUShort(cal1, 0)
  dig_T2 = getShort(cal1, 2)
  dig_T3 = getShort(cal1, 4)

  dig_P1 = getUShort(cal1, 6)
  dig_P2 = getShort(cal1, 8)
  dig_P3 = getShort(cal1, 10)
  dig_P4 = getShort(cal1, 12)
  dig_P5 = getShort(cal1, 14)
  dig_P6 = getShort(cal1, 16)
  dig_P7 = getShort(cal1, 18)
  dig_P8 = getShort(cal1, 20)
  dig_P9 = getShort(cal1, 22)

  dig_H1 = getUChar(cal2, 0)
  dig_H2 = getShort(cal3, 0)
  dig_H3 = getUChar(cal3, 2)

  dig_H4 = getChar(cal3, 3)
  dig_H4 = (dig_H4 << 24) >> 20
  dig_H4 = dig_H4 | (getChar(cal3, 4) & 0x0F)

  dig_H5 = getChar(cal3, 5)
  dig_H5 = (dig_H5 << 24) >> 20
  dig_H5 = dig_H5 | (getUChar(cal3, 4) >> 4 & 0x0F)

  dig_H6 = getChar(cal3, 6)


  # Read temperature/pressure/humidity
  data = bus.read_i2c_block_data(addr, REG_DATA, 8)
  pres_raw = (data[0] << 12) | (data[1] << 4) | (data[2] >> 4)
  temp_raw = (data[3] << 12) | (data[4] << 4) | (data[5] >> 4)
  hum_raw = (data[6] << 8) | data[7]

  #Refine temperature
  var1 = ((((temp_raw>>3)-(dig_T1<<1)))*(dig_T2)) >> 11^M  var2 = (((((temp_raw>>4) - (dig_T1)) * ((temp_raw>>4) - (dig_T1))) >> 12) * (dig_T3)) >> 14
  t_fine = var1+var2
  temperature = float(((t_fine * 5) + 128) >> 8);

  # Refine pressure and adjust for temperature
  var1 = t_fine / 2.0 - 64000.0
  var2 = var1 * var1 * dig_P6 / 32768.0
  var2 = var2 + var1 * dig_P5 * 2.0
  var2 = var2 / 4.0 + dig_P4 * 65536.0
  var1 = (dig_P3 * var1 * var1 / 524288.0 + dig_P2 * var1) / 524288.0
  var1 = (1.0 + var1 / 32768.0) * dig_P1
  if var1 == 0:
    pressure=0
  else:
    pressure = 1048576.0 - pres_raw
    pressure = ((pressure - var2 / 4096.0) * 6250.0) / var1
    var1 = dig_P9 * pressure * pressure / 2147483648.0
    var2 = pressure * dig_P8 / 32768.0
    pressure = pressure + (var1 + var2 + dig_P7) / 16.0


  # Refine humidity
  humidity = t_fine - 76800.0
  humidity = (hum_raw - (dig_H4 * 64.0 + dig_H5 / 16384.8 * humidity)) * (dig_H2 / 65536.0 * (1.0 + dig_H6 / 67108864.0 * humidity * (1.0 + dig_H3 / 67108864.0 * humidity)))
  humidity = humidity * (1.0 - dig_H1 * humidity / 524288.0)
  if humidity > 100:
    humidity = 100
  elif humidity < 0:
    humidity = 0

  return temperature/100.0,pressure/100.0,humidity

while True:
 temperature,pressure,humidity = readBME280All()

 text_file = open("/var/www/html/weather.txt", "a")
 text_file.write(str(datetime.now().strftime('%F %H:%M ')))

 # correct for bme280's high temp readout
 text_file.write("%.2f " % (((temperature)*9/5)+32-4))
 text_file.write("%.2f " % ((pressure)/33.8638866667))
 text_file.write("%.2f\n" % humidity)
 text_file.close()
 time.sleep(60)


Sunday, August 21, 2016

A $30 Wireless Weather Monitor Using a Raspberry Pi Zero


My weekend project was a wireless ambient condition monitor for the home. I used an RPi Zero (yep, i got one by mail order), SSD1306 .96" OLED, micro-usb adapter, cheap nubby Edimax wifi adapter (i have two cheaper ones, $3 MT7601s, on order), BME280 sensor, $0.67 and $0.68 junction cover and box from Homeless Despot (makes a great Zero case, and there are inexpensive heavy-duty waterproof ones that can easily hold an RPi 3 for about $7!! I'll building a remote weather station over the next month), some scrap Lexan (can't see it, but i hot-glued the display onto the Lexan), a cheap 4GB Sandis, microsdhc, and a 'Y' cable w/GPIO female headers.

All in all, a lot of fun, and now I have another visual trinket for the guest room. It has already come in handy to help us cool the kitchen by monitoring lowered temps due to the use of shades (they make about a 5-degree difference).

Friday, August 19, 2016

Combat Raspbian Software Bloat

i hate software bloat - it's bad enough that the Evil Empire has caused so much misery on this planet with its Winblows software, but when GNU/Linux distros bloat it's really sad...

don't get me wrong: i like Raspbian... but the Noobs distro is just plain dumb, and with Raspbian it's feast or famine:

- either you get a bloated, soggy, sdhc-eating install with all kinds of crap and junk most users will NEVER need

or

- in the case of Jessie Lite, a bare-bones, not even wifi-friendly distro

well friends, fear no more! thanks to Andrew Vaughn's Raspbian I love you but you're too fat, you can have a nicely crafted, customized Jessie Lite with a single command line!

here's my crafted system (i did install vnc4server, GNU ddrescue and some python extras afterwards though):

sudo apt-get update && sudo apt-get install alacarte desktop-base fonts-dejavu fonts-sil-gentium-basic gksu gnome-icon-theme gnome-themes-standard-data gtk2-engines libgl1-mesa-dri libgles1-mesa libgles2-mesa libpangox-1.0-0 lightdm lxappearance lxappearance-obconf lxde lxde-common lxde-core lxde-icon-theme lxinput lxpanel menu-xdg pcmanfm raspberrypi-net-mods raspberrypi-ui-mods xcompmgr xdg-utils xinit xserver-xorg xserver-xorg-video-fbdev xserver-xorg-video-fbturbo gpicview leafpad lxrandr lxtask lxterminal openbox pi-package rc-gui xarchiver xpdf gstreamer1.0-alsa gstreamer1.0-libav gstreamer1.0-omx gstreamer1.0-plugins-bad gstreamer1.0-plugins-base gstreamer1.0-plugins-good gstreamer1.0-x policykit-1 raspberrypi-artwork rpi-update python-gpiozero python-picamera python-pifacecommon python-pifacedigitalio python-pip python-serial python-tk python3-serial raspi-gpio tree udisks python-pygame

btw, this was done on my latest addition to my stable of tiny GNU/Linux boxen - a used Raspberry Pi Model 2 B, which i snagged for a Jackson - bazinga! bargain time!

Sunday, August 14, 2016

Easy Backup of the Beaglebone Black

I just spent an entire morning installing and removing software, and configuring my new Beaglebone Black. Thank heavens I finally found a working wifi adapter - a MediaTek MT7601 (Ralink 7601) Controller!

We all know the drill:

- boot a new computer with a new system
- spend hours configuring it
- then put a backup plan in place and back up all your hard work

It used to be quite a chore to back up a system. However, thanks to Mr. Robert Nelson, Beaglebone guru and kernel master,  backing up and cloning your eMMC (configure internal disk) on your Beaglebone system is as easy as:

1. Take a FAT-formatted microsdhc and insert into the original Beaglebone.

2. Run a simple command to start a backup script:

sudo /opt/scripts/tools/eMMC/beaglebone-black-make-microSD-flasher-from-eMMC.sh

3. Shutdown.

4. Insert the sdhc into the target Beaglebone (or your original if you're doing a restore operation)

5. Power up the Beaglebone.

The Beaglebone will boot off the microsdhc, then shut down when done. It doesn't get any easier than that! Took me about 20 minutes to back up, then clone my backup Beaglebone Black (I have two).

Crafting a BME280 Ambient Condition Monitor


I have been having a lot of fun with my Beaglebone Black now that wifi is up and running smoothly (can't believe it took so long to get a good adapter!). One of the most recent acquisitions was a Bosche BME280 sensor - tiny, with readouts of temperature, barometric pressure, and humidity - i guess smartphones are getting smarter?

Well, thankfully I didn't have to shell out an outrageous amount of dinero for this sensor. You can get 'em for less than a Hamilton on-line, so I popped for a pair. I used Matt Hawkin's excellent bme280.py script as an accessible Python lib (simply drop it in the same folder as your script), and just used the function to get the data:

  from bme280 import readBME280All

the original script returns many digit accuracy - too many for the oled, so i trimmed the output, converted from Centigrade to Fahrenheit and hectopascals to inches of mercury:

return "%.2f degrees F" % (((temperature)*9/5)+32)
return "%.2f inches mercury" % ((pressure)/33.8638866667)
return "%.2f%% humidity" % humidity
 
I like the result and will use this sensor with some wifi-enabled Arduinos for inexpensive weather monitoring. I also have a couple wind sensors I haven't tried - that's for later! So for now, here's the script:

#!/usr/bin/env python
# bbssd.py version 0.6 - a simple system monitor for the
# Beaglebone Black GNU/Linux SBC
# kg4zqz.blogspot.com
# adapted from rmhull's wonderful ssd1306 Python lib
# crafted for the dual-color 128x96 OLED w/yellow top area
# 070916 - initial version ported from a version for the Raspberry Pi
#          shows date, wlan0 IP address, memory, and sd card usage
# 070916 - added Beagle splash screen, kernel version and serial #
# 071016 - added uptime, wifi sig strength, screen cleanup
# 072616 - added text wrap to uptime screen
# 081416 - added BME280 weather sensor data/readout
#
# note: it was a bear to get all the needed software libs for
# the Pillow install - must have libjpeg6-dev and associated zlib pkgs!

import os
import psutil
from lib_oled96 import ssd1306
from time import sleep
from datetime import datetime
from PIL import ImageFont, ImageDraw, Image
from smbus import SMBus       #  These are the only two variant lines !!
i2cbus = SMBus(2)             # NOTE: Beaglebone Green Wireless uses bus 2!
oled = ssd1306(i2cbus)

draw = oled.canvas

while True:

 # "draw" onto this canvas, then call display() to show on the OLED.
 draw = oled.canvas

# show SPLASH screen
# set font to 17 for yellow area splash title
 font = ImageFont.truetype('/home/debian/Downloads/ssd1306-master/FreeSans.ttf', 17)
 draw.text((1, 1), 'BEAGLEBONE', font=font, fill=1)
# put on the dawg, which is capital 'S' in the below font
 font = ImageFont.truetype('/home/debian/Downloads/ssd1306-master/Doggon.ttf', 50)

draw.text((1, 23), ' S', font=font, fill=1)

 # now show splash screen, then sleep, then clear for next screen
 oled.display()
 sleep(3)
 oled.cls()

 # set up, display overall stats screen
 # set font to 13 for yellow area
 font = ImageFont.truetype('/home/debian/Downloads/ssd1306-master/FreeSans.ttf', 13)

 # get, display date and time
 draw.text((1, 1), str(datetime.now().strftime('%a  %b  %d  %H:%M:%S')), font=font, fill=1)

 # reset font for four smaller lines
 font = ImageFont.truetype('FreeSans.ttf', 10)

 # get, return Linux kernel version
 def uname_r():
    k = os.popen('uname -r')
    rev = str(k.read())
    # strip out trailing chars for cleaner output
    return "KERNEL: %s" % rev.rstrip('\r\n')

  # display kernel version
 draw.text((1, 15),   uname_r(),  font=font, fill=1)

 # get, return wlan0's current IP address
 def wlan_ip():
    f = os.popen('ifconfig wlan0 | grep "inet\ addr" | cut -c 21-33')
    ip = str(f.read())
    # strip out trailing chars for cleaner output
    return "WIFI IP: %s" % ip.rstrip('\r\n')

 # display the IP address
 draw.text((1, 28),    wlan_ip(),  font=font, fill=1)

 # get amount of free memory
 def mem_usage():

    usage = psutil.virtual_memory()
    return "MEM USED: %s KB" % (int(str(usage.used)) / 1024)

 # display amount of free memory
 draw.text((1, 41),    mem_usage(),  font=font, fill=1)

 # get disk usage
 def disk_usage(dir):
    usage = psutil.disk_usage(dir)
    return "SD CARD USED: %.0f%%" % (usage.percent)
 # display disk usage
 draw.text((1, 53), disk_usage('/'),  font=font, fill=1)

 # now show the entire stats screen, then clear
 oled.display()
 sleep(5)
 oled.cls()

 # read bme280 data - limit 2-digit accuracy
 def get_temp():
  from bme280 import readBME280All
  temperature,pressure,humidity = readBME280All()
 # return "%sF" % str(((temperature)*9/5)+32)
  return "%.2f degrees F" % (((temperature)*9/5)+32)

 def get_pressure():
  from bme280 import readBME280All
  temperature,pressure,humidity = readBME280All()
 # return "%s hPa" % str(pressure)
  return "%.2f inches mercury" % ((pressure)/33.8638866667)

 def get_humidity():
  from bme280 import readBME280All
  temperature,pressure,humidity = readBME280All()
 # return "%s percent" % str(humidity)
  return "%.2f%% humidity" % humidity

 font = ImageFont.truetype('/home/debian/Downloads/ssd1306-master/FreeSans.ttf', 13)
 draw.text((1, 1), 'Ambient Conditions', font=font, fill=1)

 font = ImageFont.truetype('/home/debian/Downloads/ssd1306-master/FreeSans.ttf', 12)
 draw.text((1, 20),  get_temp(),  font=font, fill=1)
 draw.text((1, 35),  get_pressure(),  font=font, fill=1)
 draw.text((1, 50),  get_humidity(),  font=font, fill=1)

 oled.display()
 sleep(5)
 oled.cls()

 # begin series of LARGE stats
 # LARGE display - get wifi wlan0 signal strength
 def get_wifi():
    cmd = "iwconfig wlan0 | grep Signal | /usr/bin/awk '{print $4}' | /usr/bin/cut -d'=' -f2"
    strDbm = os.popen(cmd).read()
    dbm = int(strDbm)
    quality = 2 * (dbm + 100)
    if strDbm:
     return("{0} dbm = {1}%".format(dbm, quality))
    else:
     return("No Wifi")

 font = ImageFont.truetype('/home/debian/Downloads/ssd1306-master/FreeSans.ttf', 17)
 draw.text((1, 1), 'WIFI SIGNAL', font=font, fill=1)
 font = ImageFont.truetype('/home/debian/Downloads/ssd1306-master/FreeSans.ttf', 15)
 draw.text((1, 30),    get_wifi(),  font=font, fill=1)

 oled.display()
 sleep(3)
 oled.cls()

 # LARGE display - uptime
 def get_uptime():
    uptime = os.popen("uptime")
    ut = str(uptime.read())
    # strip out trailing chars for cleaner output
    return "%s" % ut.rstrip('\r\n')

 font = ImageFont.truetype('/home/debian/Downloads/ssd1306-master/FreeSans.ttf', 17)
 draw.text((1, 1),    '    UPTIME',  font=font, fill=1)

# now smaller font needed and wrap text to show info
 font = ImageFont.truetype('/home/debian/Downloads/ssd1306-master/FreeSans.ttf', 11)
 import textwrap
 lines = textwrap.wrap(get_uptime(), width=25)
 # what 'line' to start info
 y_text = 20
 w = 1 # we'll always start at left side of OLED
 for line in lines:
    width, height = font.getsize(line)
    draw.text((w, y_text), line, font=font, fill=1)
    y_text += height

 oled.display()
 sleep(4)
 oled.cls()

 # LARGE display - wlan0's IP address
 def wlan_lip():
    f = os.popen('ifconfig wlan0 | grep "inet\ addr" | cut -c 21-33')
    ip = str(f.read())
    # strip out trailing chars for cleaner output
    return "%s" % ip.rstrip('\r\n')

 font = ImageFont.truetype('/home/debian/Downloads/ssd1306-master/FreeSans.ttf', 17)

 draw.text((1, 1),   ' IP ADDRESS', font=font, fill=1)
 font = ImageFont.truetype('/home/debian/Downloads/ssd1306-master/FreeSans.ttf', 16)
 draw.text((1, 30),    wlan_lip(),  font=font, fill=1)

 oled.display()
 sleep(3)
 oled.cls()

 # LARGE display - amount of free memory
 def mem_usagel():
    usage = psutil.virtual_memory()
    return "%s KB" % (int(str(usage.used)) / 1024)

 font = ImageFont.truetype('/home/debian/Downloads/ssd1306-master/FreeSans.ttf', 17)

 draw.text((1, 1),   'MEM USED', font=font, fill=1)
 draw.text((1, 30),    mem_usagel(),  font=font, fill=1)

 oled.display()
 sleep(3)
 oled.cls()

 # LARGE display - Beaglebone's serial number
 def get_serial():
    serial = os.popen('/usr/local/bin/get_serial_no')
    snum = str(serial.read())
    # strip out trailing chars for cleaner output
    return "%s" % snum.rstrip('\r\n')

 font = ImageFont.truetype('/home/debian/Downloads/ssd1306-master/FreeSans.ttf', 17)
 draw.text((1, 1),    'SERIAL NBR',  font=font, fill=1)
 # now smaller font needed
 font = ImageFont.truetype('/home/debian/Downloads/ssd1306-master/FreeSans.ttf', 15)
 draw.text((1, 30),    get_serial(),  font=font, fill=1)

 oled.display()
 sleep(3)
 oled.cls()

 # get, return current local WX
 def do_wx():
    f = os.popen('/usr/local/bin/currentwx')
    wx = str(f.read())
    # strip out trailing chars for cleaner output
    return "%s" % wx.rstrip('\r\n')

 # display the WX
 font = ImageFont.truetype('/home/debian/Downloads/ssd1306-master/FreeSans.ttf', 13)
 draw.text((1, 1),    'CURRENT WEATHER:',  font=font, fill=1)
 font = ImageFont.truetype('/home/debian/Downloads/ssd1306-master/FreeSans.ttf', 12)
 draw.text((1, 15),    ' PINELLAS PARK, FL',  font=font, fill=1)
 draw.text((1, 41),    do_wx(),  font=font, fill=1)
 

oled.display()
sleep(3)
oled.cls()      # Oled still on, but screen contents now blacked out


Wifi That Actually Works for the Beaglebone Black

I like the Beaglebone and think the Beaglebone Green Wireless is one of the best small-form-factor GNU/Linux computers. So I thought it would be nice to try a Beaglebone Black.

Boy, was I wrong! The Beaglebone Black turned out to be one of the most frustrating computers I've run across in a long time: configuring wifi was a pain in the fucking ass. I tried at least four different wifi USB dongles (there is no on-board wifi), including one that was touted as actually working (rtl8192cu). Wasted an entire day and got that sour taste in the stomach thinking I had purchased a pig-in-the-poke.

Well, life is now good. I *finally* found one that works and holds a steady connection. It's from the folks at Logic Supply:

It is a MediaTek MT7601 (Ralink 7601).  It configured right away using connmanctl. The Media Tek folks even offer drivers for GNU/Linux! Of course, you don't have to install anything if you're using kernel 4.4.x - there's firmware and a loadable module included - works great!

My Beaglebone Black has now joined my stable of working SBCs and has been spared from the parts bin.

Saturday, August 13, 2016

A Simple Calculator for the Arduino

Here's a simple calculator for the Arduino. I recently acquired a cheap ($12) 320x240 TFT and wanted to learn how to program these microcontrollers. There are some amazing demos out there for these TFTs - look for mcufriend_kbv on the Arduino.cc forums - great stuff!

Here's the calculator - I got it working on my TFT (which uses an ILI9341) by swapping x/y coordinates in the code... for some reason the swap() function didn't work for me - or perhaps it was one needs restart the IDE between orientation changes on the TFT?

NOTE: This is a *simple* calculator. I'll be working on expanding and modifying the code at some point to make it into a reasonable calculator. Don't do your taxes using this calculator!

// calculator.ino
// originally by max:
// https://github.com/maxpromer/Arduino-Touch-Calculator
// hacked by willie
// 
#include <Adafruit_GFX.h>    // Core graphics library
#include <Adafruit_TFTLCD.h> // Hardware-specific library
#include <TouchScreen.h>

#define YP A3  // must be an analog pin, use "An" notation!
#define XM A2  // must be an analog pin, use "An" notation!
#define YM 9   // can be a digital pin
#define XP 8   // can be a digital pin

#define TS_MINX 150
#define TS_MINY 120
#define TS_MAXX 920
#define TS_MAXY 940

TouchScreen ts = TouchScreen(XP, YP, XM, YM, 300);

#define LCD_CS A3
#define LCD_CD A2
#define LCD_WR A1
#define LCD_RD A0
// optional
#define LCD_RESET A4

// Assign human-readable names to some common 16-bit color values:
#define BLACK   0x0000
#define BLUE    0x001F
#define RED     0xF800
#define GREEN   0x07E0
#define CYAN    0x07FF
#define MAGENTA 0xF81F
#define YELLOW  0xFFE0
#define WHITE   0xFFFF

#define MINPRESSURE 10
#define MAXPRESSURE 1000

Adafruit_TFTLCD tft(LCD_CS, LCD_CD, LCD_WR, LCD_RD, LCD_RESET);

// keypad array
String Key[4][4] = {
  { "7", "8", "9", "/" },
  { "4", "5", "6", "*" },
  { "1", "2", "3", "-" },
  { "C", "0", "=", "+" }
};

String N1, N2, ShowSC, opt;
bool updata=false;
float answers=-1;

void setup() {
  Serial.begin(9600);
  tft.reset();
  tft.begin(0x9341); // SDFP5408
  tft.setRotation(2); //portrait, power on top
  tft.fillScreen(BLACK);
 
  tft.fillRect(0, 80, 240, 240, WHITE);
  tft.drawFastHLine(0, 80, 240, BLACK);
  tft.drawFastHLine(0, 140, 240, BLACK);
  tft.drawFastHLine(0, 200, 240, BLACK);
  tft.drawFastHLine(0, 260, 240, BLACK);
  tft.drawFastHLine(0, 320-1, 240, BLACK);

  tft.drawFastVLine(0, 80, 240, BLACK);
  tft.drawFastVLine(60, 80, 240, BLACK);
  tft.drawFastVLine(120, 80, 240, BLACK);
  tft.drawFastVLine(180, 80, 240, BLACK);
  tft.drawFastVLine(240-1, 80, 240, BLACK);

  for (int y=0;y<4;y++) {
    for (int x=0;x<4;x++) {
      tft.setCursor(22 + (60*x), 100 + (60*y));
      tft.setTextSize(3);
      tft.setTextColor(BLACK);
      tft.println(Key[y][x]);
    }
  }
}

void loop() {
  TSPoint p = waitTouch();
 
  updata = false;
  for (int i1=0;i1<4;i1++) {
    for (int i2=0;i2<4;i2++) {
// change to swap x,y
//      if ((p.x>=240-((i1+1)*60)+1&&p.x<=240-(i1*60)-1)&&(p.y>=(i2*60)+1&&p.y<=((i2+1)*60)-1)) {
      if ((p.y>=240-((i1+1)*60)+1&&p.y<=240-(i1*60)-1)&&(p.x>=(i2*60)+1&&p.x<=((i2+1)*60)-1)) {
        if ((i1<=2&&i2<=2)||(i1==3&&i2==1)) {
          if (opt==0) {
            if (answers!=-1) answers = -1;
            N1 = N1 + Key[i1][i2];
            ShowSC = N1;
          } else {
            N2 = N2 + Key[i1][i2];
            ShowSC = opt + N2;
          }
        } else {
          if (Key[i1][i2]=="C") {
            N1 = N2 = "";
            opt = "";
            answers = 0;
            ShowSC = N1;
          } else if (i2==3) {
            if (N1=="") N1 = String(answers);
            opt = Key[i1][i2];
            ShowSC = Key[i1][i2];
          } else if (Key[i1][i2]=="=") {
            // perform calculation
            if (opt=="+") answers = N1.toInt() + N2.toInt();
            else if (opt=="-") answers = N1.toInt() - N2.toInt();
            else if (opt=="*") answers = N1.toInt() * N2.toInt();
            else if (opt=="/") answers = N1.toInt() / N2.toInt();
            N1 = N2 = opt = "";
            ShowSC = answers;
          }
        }
        updata = true;
      }
    }
  }
  if (updata) {
    tft.fillRect(0, 0, 240, 80, BLACK);
    tft.setCursor(10, 10);
    tft.setTextSize(3);
    tft.setTextColor(WHITE);
    tft.println(ShowSC);
  }
  delay(300);
}

// get x,y touch coordinates
TSPoint waitTouch() {
  TSPoint p;
  do {
    p = ts.getPoint();
    pinMode(XM, OUTPUT);
    pinMode(YP, OUTPUT);
  } while((p.z < MINPRESSURE )|| (p.z > MAXPRESSURE));
  p.x = map(p.x, TS_MINX, TS_MAXX, tft.width(), 0);
  p.y = map(p.y, TS_MINY, TS_MAXY, tft.height(), 0);
//  Serial.println('x'); Serial.println(p.x);
//  Serial.println('y'); Serial.println(p.y);
  return p;
}

Wednesday, August 10, 2016

Yet Another Confusing Arduino Issue - YUN

found this today:

concerning the Yun on arduino.cc

quote:

As many of you know, there is a split with the Arduino organization. The two are generally two Internet domains that encompass the two parties - arduino.cc and arduino.org. To be clear on the separation, arduino.cc does NOT have the Arduino Yun, but is creating a new product with a new partner. Arduino.org has the Yun, Yun mini, Tian, Uno wireless - and other similar products.

There are several issues for developers.
- what are the new products
- support for hardware
- support for software
- will some libraries still be support, like Bridge
- forum support

For .org, it is creating new products and we see them every few months. This is organization is being helped by doghunter. Neither the .org or doghunter have stated any allegiance to open source. The issue this creates is that some developer are unlikely to contribute to the massive software pool mostly available on .cc  One small note, if you look on the back of the original Yun you will see a "dog Hunter" imprint. It is underneath the Ethernet port, on the back side of the PC board.

For .cc, which is known as Genuino in most part of the world - expect the USA, they have struggled to produce significantly new products, and their new partnerships with Adafruit and Seeed have not yield any significantly new products. The challenge is - how will they address the growing IOT market - no response yet on this.


On the libraries, both groups appear to be making advancement. However, new contributions are continuing with .cc, not as much with .org.

On the support forums, .cc definitely had the advantage.


so there you have it... but of course you may also own a Seeedstudio Cloud or a Dragino Yun Shield

i like them all, but really when you can have a Raspberry Pi 3 Model B or a Raspberry Pi Zero

why? well, if you're a real-time hacker and have a need for speed, low power consumption, the 'Yun' model may work for you - best of both worlds?

Tuesday, August 9, 2016

An SSD1306 OLED System Monitor for the Raspberry Pi

 
Here's a simple system monitor for the Raspberry Pi using an SSD1306 OLED and a BME280 sensor (to get temperature, barometric pressure and humidity). You'll need to construct an iC2 'Y' cable and plug into the GPIO pins on your Pi. Make sure to enable iC2 for Raspbian, then download and install rm-hull's Github SSD1306 library, along with Matt Hawkin's bme280.py script. Put everything into the same directory.

After testing to make sure that your sensor and OLED are working, use this script to get a host of information about your Pi, ambient conditions and even local weather.

Here's the script:

#!/usr/bin/env python
# myssd.py version 0.8 - a simple system monitor for the Raspberry Pi
# adapted from rmhull's wonderful ssd1306 Python lib by bball@tux.org
# crafted for the dual-color 128x96 OLED w/yellow top area
# 060316 - added date, CPU temp, wlan0 IP addr, memory, sd card used
# 060416 - added splash screen, general code cleanup, KB output for memory
# 061316 - added local current WX conditions
# 080616 - added wifi, serial number, uptime with text wrap
# 080816 - added BME280 output of temp, pressure, and humidity

import os
import psutil
from lib_oled96 import ssd1306
from time import sleep
from datetime import datetime
from PIL import ImageFont, ImageDraw, Image
#font = ImageFont.load_default()

from smbus import SMBus                  #  These are the only two variant lines !!
i2cbus = SMBus(1)                        #
oled = ssd1306(i2cbus)

draw = oled.canvas  
# set font to 13 for yellow area
font = ImageFont.truetype('FreeSans.ttf', 13)

# show splash screen
draw.text((1, 1), 'RASPBIAN SYSMON', font=font, fill=1)
logo = Image.open('rpi.png')
draw.bitmap((42, 16), logo, fill=1)

oled.display()
sleep(3)
oled.cls()

while True:

 # "draw" onto this canvas, then call display() to send the canvas contents to the hardware.
 draw = oled.canvas  

 # set font to 13 for yellow area
 font = ImageFont.truetype('FreeSans.ttf', 13)

 # get, display date and time
 draw.text((1, 1), str(datetime.now().strftime('%a  %b  %d  %H:%M:%S')), font=font, fill=1)

 # reset font for four smaller lines
 font = ImageFont.truetype('FreeSans.ttf', 10)

 # get, return CPU's current temperature
 def cpu_temp():
    tempF = (((int(open('/sys/class/thermal/thermal_zone0/temp').read()) / 1000)*9/5)+32)
    return "CPU TEMP: %sF" % str(tempF)
 
  # display CPU temp
 draw.text((1, 15),    cpu_temp(),  font=font, fill=1)

 # get, return wlan0's current IP address
 def wlan_ip():
    f = os.popen('ifconfig wlan0 | grep "inet\ addr" | cut -c 21-33')
    ip = str(f.read())
    # strip out trailing chars for cleaner output
    return "WIFI IP: %s" % ip.rstrip('\r\n')

 # display the IP address
 draw.text((1, 28),    wlan_ip(),  font=font, fill=1)

 # get amount of free memory
 def mem_usage():
    usage = psutil.virtual_memory()
    return "MEM USED: %s KB" % (int(str(usage.used)) / 1024)

 # display amount of free memory
 draw.text((1, 41),    mem_usage(),  font=font, fill=1)

 # get disk usage
 def disk_usage(dir):
    usage = psutil.disk_usage(dir)
    return "SD CARD USED: %.0f%%" % (usage.percent)

 # display disk usage
 draw.text((1, 53), disk_usage('/'),  font=font, fill=1)
 oled.display()

 sleep(6)
 oled.cls()      # Oled still on, but screen contents now blacked out

# LARGE display - get wifi wlan0 signal strength
 def get_wifi():
    cmd = "iwconfig wlan0 | grep Signal | /usr/bin/awk '{print $4}' | /usr/bin/cut -d'=' -f2"
    strDbm = os.popen(cmd).read()
    dbm = int(strDbm)
    quality = 2 * (dbm + 100)
    if strDbm:
     return("{0} dbm = {1}%".format(dbm, quality))
    else:
     return("No Wifi")

 font = ImageFont.truetype('/home/pi/Downloads/ssd1306-master/FreeSans.ttf', 17)
 draw.text((1, 1), 'WIFI SIGNAL', font=font, fill=1)
 font = ImageFont.truetype('/home/pi/Downloads/ssd1306-master/FreeSans.ttf', 15)
 draw.text((1, 30),    get_wifi(),  font=font, fill=1)

 oled.display()
 sleep(2)
 oled.cls()

# LARGE display - uptime
 def get_uptime():
    uptime = os.popen("uptime")
    ut = str(uptime.read())
    # strip out trailing chars for cleaner output
    return "%s" % ut.rstrip('\r\n')

 font = ImageFont.truetype('/home/pi/Downloads/ssd1306-master/FreeSans.ttf', 17)
 draw.text((1, 1),    '    UPTIME',  font=font, fill=1)

 # now smaller font needed and wrap text to show info
 font = ImageFont.truetype('/home/pi/Downloads/ssd1306-master/FreeSans.ttf', 11)
 import textwrap
 lines = textwrap.wrap(get_uptime(), width=25)
 # what 'line' to start info
 y_text = 20
 w = 1 # we'll always start at left side of OLED
 for line in lines:
    width, height = font.getsize(line)
    draw.text((w, y_text), line, font=font, fill=1)
    y_text += height

 oled.display()
 sleep(2)
 oled.cls()

# LARGE display - get, display serial number
 def get_serial():
    cmd = "cat /proc/cpuinfo | grep Serial | /usr/bin/awk '{print $3}'"
    strDbm = os.popen(cmd).read()
    snum = str(strDbm)
    return "%s" % snum.rstrip('\r\n')

 font = ImageFont.truetype('/home/pi/Downloads/ssd1306-master/FreeSans.ttf', 17)
 draw.text((1, 1), 'Serial Number', font=font, fill=1)
 font = ImageFont.truetype('/home/pi/Downloads/ssd1306-master/FreeSans.ttf', 14)
 draw.text((1, 30),    get_serial(),  font=font, fill=1)

 oled.display()
 sleep(1)
 oled.cls()

# read bme280 data
 def get_temp():
  from bme280 import readBME280All
 
  temperature,pressure,humidity = readBME280All()
 
  return "%.2f degrees F" % (((temperature)*9/5)+32)

 def get_pressure():
  from bme280 import readBME280All
 
  temperature,pressure,humidity = readBME280All()
 
  return "%.2f inches mercury" % ((pressure)/33.8638866667)

 def get_humidity():
  from bme280 import readBME280All
 
  temperature,pressure,humidity = readBME280All()
 
  return "%.2f%% humidity" % humidity

 font = ImageFont.truetype('/home/pi/Downloads/ssd1306-master/FreeSans.ttf', 13)
 draw.text((1, 1), 'Ambient Conditions', font=font, fill=1)

 font = ImageFont.truetype('/home/pi/Downloads/ssd1306-master/FreeSans.ttf', 11)
 draw.text((1, 20),  get_temp(),  font=font, fill=1)
 draw.text((1, 35),  get_pressure(),  font=font, fill=1)
 draw.text((1, 50),  get_humidity(),  font=font, fill=1)

 oled.display()
 sleep(10)
 oled.cls()

 # get, return current WX
 def do_wx():
    f = os.popen('/usr/local/bin/currentwx')
    wx = str(f.read())
    # strip out trailing chars for cleaner output
    return "%s" % wx.rstrip('\r\n')

 font = ImageFont.truetype('FreeSans.ttf', 13)
 draw.text((1, 1),    'CURRENT WEATHER:',  font=font, fill=1)

 # display the WX
 font = ImageFont.truetype('FreeSans.ttf', 12)
 draw.text((1, 15),    'PINELLAS PARK',  font=font, fill=1)
 draw.text((1, 41),    do_wx(),  font=font, fill=1)

 oled.display()
 sleep(10)
 oled.cls()      # Oled still on, but screen contents now blacked out

escposf - A Thermal Printer Filter and Control Command for Linux

escposf - A Thermal Printer Filter and Control Command for Linux

There are millions of thermal printers out there! After recently acquiring a Raspberry Pi 3 computer, I got interested in obtaining and using a matching inexpensive printer. This page provides a short description of a quick hack I ginned up to control printing from the command line or through shell scripts. The command, escposf, simply outputs the requisite control characters to change how the printer prints on the thermal printer. BTW, I first used a thermal printer back in the day when you had to strap a sheet of thermal paper on a metal cylinder, call a remote transmitter, then slam the phone into the rubber cups on the receiving unit - faxes were pretty crude back then!

Note that escposf sends control codes directly to the printer. On the other hand, if you just want a straightforward, easy-to-build CUPS driver, check out the zj-58 filter.  The zj-58 filter rasterizes your document image and sends that image to the printer. I created a LibreOffice Writer document template for use with the zj-58 filter. The template has the following settings: 58mm width, 219mm length, with 0 top and bottom margins and a 2mm left margin and 2.5mm right margin - this works very well, too! As you can see, you can create just about any printout you like, such as tickets, etc.


Using escposf for direct printing is pretty easy. Download the source code and build it!

/*
 * escposf - send or embed printing control data for an ESC/POS format thermal printer.
 *
 * (c)2016 by bball@tux.org for his Raspberry Pi 3 computer's thermal printer
 * Distributed under GNU GPLV3. Get it, read it, use it, love it.
 *
 * note that not all ESC/POS-compatible printers share the same ESC/POS codes!
 *
 * the primary use of this command is to set the printing mode or embed ESC/POS codes
 * into a text stream or file for printing
 *
 * version 0.1 - working bold, underline, alignment, reverse, and 4 types of text types
 * version 0.2 - changed name from escpos_util to escposf (ESC/POS filter)
 *               added font a/b selection, overstrike
 * version 0.3 - added printer initialization (clear buffer, reset to 'standard' mode)
 * version 0.4 - added code cleanup, printer_test shell script to package
 * version 0.5 - removed non-working options (boldface, double-strike)
 */

#include <stdlib.h>
#include <stdio.h>
#include <stdbool.h>

/* additions for command-line processing */
#include <getopt.h>
#include <argp.h>  /* <-- comment out header to build for Mac OS X */

/* command-line help */
const char *version="escposf 0.5";
const char *bug_address="<bball@tux.org>";
static char doc[]="ESC/POS thermal printer command";

void usage() {
printf("%s - %s\n",version,doc);
printf("Control ESC/POS thermal printer output.\n");
printf("Typical usage:\n");
printf("escposf --a 1 | lpr -P lpname -o raw (set text centering)\n");
printf("escposf --f 1 >filename.txt          (embed font selection)\n");
printf("Command-line options are:\n");
printf("[--align n]  [--a n] - align text (0-left, 1-ctr, 2-rght)\n");
printf("[--font n]   [--f n] - select font (0-normal, 1-condensed)\n");
printf("[--init]     [--i]   - reset [initialize] printer\n");
printf("[--rev n]    [--r n] - reverse text (0-off, 1-on)\n");
printf("[--text n]   [--t n] - set text (0-norm, 1-2Xh, 2-2Xw, 3-large)\n");
printf("[--underl n] [--u n] - underline (0-off, 1-1 dot, 2-2 dots)\n");
printf("[--help]     [--h]   - display this message \n");
printf("[--version]  [--v]   - display program version \n");
printf("bug reports, fixes to: %s\n",bug_address);
}

/* control alignment */
int align(int option)
{
    switch (option) {
        case 0: putchar(0x1b); putchar(0x61); putchar(0x00); exit(0); break;
        case 1: putchar(0x1b); putchar(0x61); putchar(0x01); exit(0); break;
        case 2: putchar(0x1b); putchar(0x61); putchar(0x02); exit(0); break;
    }
    printf("ERROR: align option out of range (0-2).\n");
    exit(0); 
}

/* reset, initialize printer */
void init() { putchar(0x1b); putchar(0x40); }

/* control font type (normal, condensed) */
int font(int option)
{
    switch (option) {
        case 0: putchar(0x1b); putchar(0x4d); putchar(0x00); exit(0); break;
        case 1: putchar(0x1b); putchar(0x4d); putchar(0x01); exit(0); break;
    }
    printf("ERROR: font-selection option out of range (0 or 1).\n");
    exit(0); 
}

/* control reverse text */
int reverse(int option)
{
    switch (option) {
        case 0: putchar(0x1d); putchar(0x42); putchar(0x00); exit(0); break;
        case 1: putchar(0x1d); putchar(0x42); putchar(0x01); exit(0); break;
    }
    printf("ERROR: reverse text option out of range (0 or 1).\n");
    exit(0); 
}

/* control underlining */
int underline(int option)
{
    switch (option) {
        case 0: putchar(0x1b); putchar(0x2d); putchar(0x00); exit(0); break;
        case 1: putchar(0x1b); putchar(0x2d); putchar(0x01); exit(0); break;
        case 2: putchar(0x1b); putchar(0x2d); putchar(0x02); exit(0); break;
    }
    printf("ERROR: underline option out of range (0-2).\n");
    exit(0); 
}

/* control text type */
int text(int option)
{
    switch (option) {
        case 0: putchar(0x1b); putchar(0x21); putchar(0x00); exit(0); break;
        case 1: putchar(0x1b); putchar(0x21); putchar(0x10); exit(0); break;
        case 2: putchar(0x1b); putchar(0x21); putchar(0x20); exit(0); break;
        case 3: putchar(0x1b); putchar(0x21); putchar(0x30); exit(0); break;
    }
    printf("ERROR: text option out of range (0-3).\n");
    exit(0); 
}

int main(int argc, char *argv[]) {

    int c = 0;
        static struct option long_options[] = {
            {"align", 1, 0, 'a'},
            {"font", 1, 0, 'f'},
            {"help", 0, 0, 'h'},
            {"init", 0, 0, 'i'},
        {"rev", 1,0, 'r'},
            {"text", 1, 0, 't'},
            {"underl", 1, 0, 'u'},
            {"version", 0, 0, 'v'}
    }; /* end of long options structure */

    while (1) {
        c = getopt_long(argc, argv, "?:a:f:h:i:r:t:u:v:", long_options, 0);
        if (c == -1) {  usage();  break; }
        switch(c) {
            case 'a': align(atoi(optarg)); break;
            case 'f': font(atoi(optarg)); break;
            case 'h': usage(); exit(0); break;
            case 'i': init(); exit(0); break;
            case 'r': reverse(atoi(optarg)); break;
            case 't': text(atoi(optarg)); break;
            case 'u': underline(atoi(optarg)); break;
            case 'v': printf("%s - %s\n",version,doc); exit(0); break;
        case ':': fprintf(stderr, "missing arg\n"); exit(-1); break;
             default: usage(); exit(0);
        } /* end switch */
    } /* end while loop */
  return 0;
}


A simple make will create the command for you. I keep it under /usr/local/bin.

Use the --help, --h, or --? options to get a quick list of commands:

$ escposf
escposf 0.5 - ESC/POS thermal printer command
Control ESC/POS thermal printer output.
Typical usage:
escposf --a 1 | lpr -P lpname -o raw (set text centering)
escposf --f 1 >filename.txt          (embed font selection)
Command-line options are:
[--align n]  [--a n] - align text (0-left, 1-ctr, 2-rght)
[--font n]   [--f n] - select font (0-normal, 1-condensed)
[--init]     [--i]   - reset [initialize] printer
[--rev n]    [--r n] - reverse text (0-off, 1-on)
[--text n]   [--t n] - set text (0-norm, 1-2Xh, 2-2Xw, 3-large)
[--underl n] [--u n] - underline (0-off, 1-1 dot, 2-2 dots)
[--help]     [--h]   - display this message
[--version]  [--v]   - display program version

Instead of going into a long description, here's an example script I use to print a shopping list (helped to get rid of a pad of paper and pencil off the kitchen counter):

#!/bin/sh
# psl - print shopping list on thermal printer

# graphic pathname
GRAPHIC=/home/pi/Desktop/thermal_pics/cat_smile.png

# text list pathname
LIST=/home/pi/Desktop/shoplist

# print custom header
/usr/local/bin/png2escpos $GRAPHIC | /usr/bin/lpr -Pthermie -o raw

# set reverse character printing
/usr/local/bin/escposf -r 1 >/tmp/out.txt

# set 2Xw font
/usr/local/bin/escposf -t 3 >>/tmp/out.txt

echo "*SHOPPING LIST*" >>/tmp/out.txt

# turn off reverse
/usr/local/bin/escposf -r 0 >>/tmp/out.txt

# select normal font
/usr/local/bin/escposf -t 0 >>/tmp/out.txt

# save each line to /tmp file (avoids multiple print jobs)
while read line; do
    echo "$line" >>/tmp/out.txt
done < $LIST

# reset to normal font
/usr/local/bin/escposf -t 0 >>/tmp/out.txt

# print the list
/usr/bin/lpr -Pthermie -o raw /tmp/out.txt

# clean up
/bin/rm -fr /tmp/out.txt


Note that I use the png2escpos utility to print little graphics at the top of the tape!

Oh, and here's a little test script for use with your printer (you'll need to edit it to suit your system):

#!/bin/sh
# ptest - test some escposf commands for a 58mm ESC/POS thermal printer
#
# note: modes are persistent between settings, not power-cycling
#
FILE=/tmp/out.txt

# initialize printer
escposf --i >/tmp/out.txt
# set 'normal' text
escposf --t 0 >/tmp/out.txt
echo "Normal text." >>/tmp/out.txt
echo "ABCDEFGHIJKLMNOPQRSTUVWXYZ" >>/tmp/out.txt
echo "abcdefghijklmnopqrstuvwxyz" >>/tmp/out.txt
echo "0123456789" >>/tmp/out.txt
echo "?&'-@';]{]}/,.$:%^\!&*)(_~" >>/tmp/out.txt

escposf --a 0 >>/tmp/out.txt
echo "Left aligned." >>/tmp/out.txt

escposf --a 1 >>/tmp/out.txt
echo "Centered." >>/tmp/out.txt

escposf --a 2 >>/tmp/out.txt
echo "Right aligned." >>/tmp/out.txt

escposf --a 0 >>/tmp/out.txt
escposf --r 1 >>/tmp/out.txt
echo "REVERSED TEXT" >>/tmp/out.txt

escposf --r 0 >>/tmp/out.txt
escposf --t 1 >>/tmp/out.txt
echo "2X high." >>/tmp/out.txt

escposf --r 1 >>/tmp/out.txt
escposf --t 1 >>/tmp/out.txt
echo "Reversed 2X high." >>/tmp/out.txt

escposf --r 0 >>/tmp/out.txt

escposf --t 2 >>/tmp/out.txt
echo "2X wide" >>/tmp/out.txt

escposf --r 1 >>/tmp/out.txt
escposf --t 2 >>/tmp/out.txt
echo "Reversed 2X" >>/tmp/out.txt

escposf --r 0 >>/tmp/out.txt
escposf --t 3 >>/tmp/out.txt
echo "Large text." >>/tmp/out.txt

escposf --r 1 >>/tmp/out.txt
escposf --t 3 >>/tmp/out.txt
echo "Reversed large" >>/tmp/out.txt

escposf --r 0 >>/tmp/out.txt
escposf --t 0 >>/tmp/out.txt
escposf --u 2 >>/tmp/out.txt
echo "Normal underlined." >>/tmp/out.txt

escposf --u 0 >>/tmp/out.txt
escposf --f 1 >>/tmp/out.txt
echo "Font B." >>/tmp/out.txt
echo "ABCDEFGHIJKLMNOPQRSTUVWXYZ" >>/tmp/out.txt
echo "abcdefghijklmnopqrstuvwxyz" >>/tmp/out.txt
echo "0123456789" >>/tmp/out.txt
echo "?&'-@';]{]}/,.$:%^\!&*)(_~" >>/tmp/out.txt

escposf --t 0 >>/tmp/out.txt
echo "End of test.\n\n\n" >>/tmp/out.txt

/usr/bin/lpr -Pthermie -o raw /tmp/out.txt
/bin/rm -fr /tmp/out.txt


I hope you find escposf useful.

Sunday, August 7, 2016

Getting Started with the Beaglebone Green Wireless


Getting Started with the BeagleBone Green Wireless ARM Computer

I recently acquired yet another small GNU/Linux-based computer - Seeedstudio's BeagleBone Green Wireless. Thanks to an enthusiastic endorsement and a pass-around at a local Linux users group meeting (we like to do 'Show and Tell' with different gear), I started looking in the BeagleBone line of computers. The original board only had 256MB RAM, while the latest BeagleBone Black has 500MB - but only one USB port and no built-in wifi. This was kind of a deal-breaker for me (although I'm sure there are many satisfied owners). And there is a BeagleBone Green, which appears to be about the same computer minus an HDMI port. I'm used to headless GNU/Linux boxen, so no HDMI wasn't a deal breaker. But I like the idea of built-in wifi. So when I saw the BeagleBone Green Wireless, along with its four USB ports but still minus HDMI, I took the plunge.

This page is my experience with the BBGW as I call it. I'll update this page as I go along (much of the initial info was from my Amazon review - i hope it helps to get more folks interested - especially n00bs like me).

:-)

First Things First - Setting Up the BeagleBone Green Wireless Wifi

Where to start? How about this: Here is my 10-Step 'HOWTO' on how i got the BBGW 'out of the box' to work standalone on my network.

Basically:

1. I first navigated to BeagleBoard.org's 'getting started' web site.

2. Since I don't use any Microsoft products, I downloaded and installed the HoRNDIS and FTDI drivers for my Mac, and then rebooted.

3. Then I attached the included stubby USB cable to the BBGW, and plugged it into my Mac.

4. The BBGW booted, and I waited until two of the USR lights on the board started to 'dance' in unison.

5. Next, I selected the 'Beaglebone' wifi Access Point (which didn't require a password). NOTE: It's not necessary to do this! Just if you want to see the 'Getting Started' stuff. Also note: If you see another 'Beaglebone' wifi AP, but it requires a password, use 'BeagleBone' (finally found that buried in /etc/network). You'll also see a FAT-formatted partition on the BBGW mounted on your system.

6. Next, I opened a Terminal, then SSH'd into the BBGW with: ssh root@beaglebone.local. (This was possible due to the RNDIS driver, which allows networking over USB)

7. To start WiFi configuration, I then ran the connmanctl program from the command line. (Do a web search on "Debian wifi how to use" to see the exact steps or read below on this page).

8. I then quit the connmanctl program after wifi was configured and shutdown the BBGW.

9. Disconnected the BBGW from the USB cable.

10. Attached a 5V power supply to the micro usb and rebooted - then SSH'd into the BBGW standalone. If you log in as the user 'debian,' the password will be 'temppwd'

Initial Impressions

There's a lot to like about this Texas Instruments-CPU'd device... 4 USB ports are welcome here, along with the 1GHz CPU... and honestly, only 500MB RAM isn't too hobbling due to the low memory requirements of most ARM clients... lots of little LEDs and lights (nearly all controllable through software)... the four USR lights are especially handy as an indicator of power, CPU, microsdhc (card slot) and Emmc activity. (The 'heartbeat' and CPU LEDs 'dance' in unison when the system is a'runnin'!). And I think the built-in 4GB eMMC storage was a brilliant addition - quite handy!

As a bonus, the included stubby USB cable also works with Raspberry Pi Zero as a USB/Power/Networking RNDIS ( Remote Network Driver Interface Specification) cable!

And 69 (65-addressable, IIRC) GPIO ports! there are going to be plenty of accessories for this computer! not only that, but you can also get many different cross-hardware-platform sensors to attach to this device.

This is a nice little GNU/Linux computer, but honestly, the documentation is very lacking and for a n00b very confusing... the example 'howto' sheet included with the BBG didn't work for me - but then, where do you go? do you use BeagleBone.org's info? or Seeedstudio's BeagleBone Wiki? or the eLinux Debian wiki? who provides the best single-point of support? (hint: it ain't Seeedstudio)... i did get a friendly few comments on the beaglebone IRC channel, but getting this thing up and running from scratch, especially if you don't know GNU/Linux, is going to be a challenge for some folks.

At this point i have a fully functioning BBGW. But boy howdy, those included wifi antennas are hideous, aren't they? But then again, some folks (especially Amateur Radio ops like me) love antennas. I haven't tried the antennas yet as the built-in wifi connects just fine to my AP 20 feet away. The small ceramic wifi antenna on one corner of the BBGW's board is more than adequate for my use - it may be interesting to do some antenna modeling of the performance of the two antennas (which look like two tiny amateur radio Buddipoles)

This is a new product, so give it some time to garner support and popularity... but if you're new to GNU/Linux, especially on the ARM platform, a Raspberry Pi3 might be a *much* better device to start with - just MHO, YMMV. However, if you're a die-hard embedded device programmer wanting to scratch a real-time performance itch, this could be your dream device.

There's no HDMI on this unit. I ordered, then tried an HDMI 'cape' - and at the time of this writing it is not supported under the 4.X.X-series of Linux kernels. I may explore a USB 2.0 HDMI adapter at some point. I hope the HDMI cape will be supported in the future, and will update this page when it works.

Fine Tuning the Distro

One potential initial stumbling block for n00bs (especially those new to Debian): Repositories became available after issuing:

sudo apt-get update

The only real base system configuration needed was to have the correct timezone. A simple:

sudo dpkg-reconfigure tzdata

fixed that for me.

Some System Stats and Showing the BeagleBone Green Wireless Serial Number

If you look along the cape rail along the ceramic antenna side of the BBGW, you'll see a sticker stating the serial number and MAC address. You can get the serial number from dmesg output by grepping for 'BBGW':

$ dmesg | grep BBGW

[ 2.234539] bone_capemgr bone_capemgr: Baseboard: 'A335BNLT,GW1A,BBGW16055468'

Obviously you'll use either awk or cut to extract just the number:

$ dmesg | grep BBGW | cut -c 69-80

BBGW16055468

I haven't dug into the kernel source to see how the number is extracted. There are a few handy CPU-related utilities under /usr/bin:

/usr/bin/cpufreq-aperf - calculates average freq over set time
/usr/bin/cpufreq-info - report cpu freq kernel info
/usr/bin/cpufreq-set - modify cpu settings (under- or over-clock)

You'll find other info under the /sys directory:

$ ls /sys/devices/system/cpu/cpu0/cpufreq/
affected_cpus related_cpus scaling_governor
cpuinfo_cur_freq scaling_available_frequencies scaling_max_freq
cpuinfo_max_freq scaling_available_governors scaling_min_freq
cpuinfo_min_freq scaling_cur_freq scaling_setspeed
cpuinfo_transition_latency scaling_driver stats

A number of these values report "." I have yet to explore over-clocking (no real reason to with a 1GHz CPU, but hey...). Some of the values found under the 'governors' directory are:

conservative ondemand userspace powersave performance

I'll assume that these correspond to other GNU/Linux ARM distros. As usual, if you seek information, you must go to the source:

https://www.kernel.org/doc/Documentation/cpu-freq/governors.txt

Oh, and want to monitor the CPU temperature of the BBGW's TI CPU? It's not supported unless you install an external hardware sensor.

Configuring and Booting a Current Beaglebone.org Release on microSDHC on the BeagleBone Green Wireless

Being an intrepid and foolish person, I then proceeded to try configuring and running a 'bone' distro from the microsdhc. First, I followed the link to Beagleboard.org's listing of software images. The latest listed there at the time of this writing is bone-debian-8.4-lxqt-4gb-armhf-2016-05-13-4gb.img.xz. Here are the steps I used to get my BBGW booting from the release on microsdhc:

1. Decompressed, then burned the image file onto a spare microsdhc.

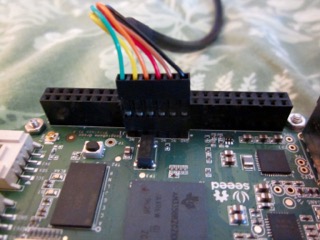
2. Inserted the card into the BBGW. Attached an FTDI USB TTY cable to the J1 connector on the BBGW, then plugged into my Mac. Here is what it looks like attached to my BBGW:


3. Launched Zterm on my Mac and set a connection for: 115200, 8, N, 1 (Xon/Xoff was enabled).

4. Held down the BBGW boot button. Then applied power. You'll see the power-up sequence, then the loading of the boot file and boot process. A fsck error will appear at first, but then BeagleBoard.org's Debian will boot:

U-Boot 2016.03-00001-g148e520 (Jun 06 2016 - 11:27:44 -0500), Build: jenkins-github_Bootloader-Builder-395
Watchdog enabled
I2C: ready
DRAM: 512 MiB
Reset Source: Power-on reset has occurred.
MMC: OMAP SD/MMC: 0, OMAP SD/MMC: 1
Using default environment
Net: not set. Validating first E-fuse MAC

Could not get PHY for cpsw: addr 0
cpsw, usb_ether

Press SPACE to abort autoboot in 2 seconds

If you press the spacebar, the booting process will halt. You can then continue the boot process by using the keyword 'boot':

=> boot
switch to partitions #0, OK
mmc0 is current device
Scanning mmc 0:1...
gpio: pin 56 (gpio 56) value is 0
gpio: pin 55 (gpio 55) value is 0
gpio: pin 54 (gpio 54) value is 0
gpio: pin 53 (gpio 53) value is 1
switch to partitions #0, OK
mmc0 is current device
gpio: pin 54 (gpio 54) value is 1
Checking for: /uEnv.txt ...
1179 bytes read in 10 ms (114.3 KiB/s)
gpio: pin 55 (gpio 55) value is 1
Loaded environment from uEnv.txt
Importing environment from mmc ...
Checking if uenvcmd is set ...
gpio: pin 56 (gpio 56) value is 1
Running uenvcmd ...
1197 bytes read in 42 ms (27.3 KiB/s)
debug: [/boot/vmlinuz-4.4.9-ti-r25] ...
7833256 bytes read in 466 ms (16 MiB/s)
debug: [/boot/initrd.img-4.4.9-ti-r25] ...
4761957 bytes read in 295 ms (15.4 MiB/s)
debug: [/boot/dtbs/4.4.9-ti-r25/am335x-bonegreen-wireless.dtb] ...
61860 bytes read in 106 ms (569.3 KiB/s)
debug: [console=tty0 console=ttyO0,115200n8 root=/dev/mmcblk0p1 rootfstype=ext4 rootwait coherent_pool=1M quiet cape_universal=enable] ...
debug: [bootz 0x82000000 0x88080000:48a965 0x88000000] ...
Kernel image @ 0x82000000 [ 0x000000 - 0x7786a8 ]
## Flattened Device Tree blob at 88000000
Booting using the fdt blob at 0x88000000
Using Device Tree in place at 88000000, end 880121a3
Starting kernel ...

[ 1.998573] wkup_m3_ipc 44e11324.wkup_m3_ipc: could not get rproc handle
[ 2.145972] omap_voltage_late_init: Voltage driver support not added
[ 2.153245] PM: Cannot get wkup_m3_ipc handle
[ 2.273559] bone_capemgr bone_capemgr: slot #0: No cape found
[ 2.317525] bone_capemgr bone_capemgr: slot #1: No cape found
[ 2.361534] bone_capemgr bone_capemgr: slot #2: No cape found
[ 2.405520] bone_capemgr bone_capemgr: slot #3: No cape found
Loading, please wait...
fsck: error 2 (No such file or directory) while executing fsck.ext4 for /dev/mmcblk0p1
fsck exited with status code 8
[ 10.326679] systemd-fsck[158]: rootfs: clean, 131433/935424 files, 834835/3775744 blocks
12.132573] 7ystemd-fsck[237]: /dev/mmcblk0p2: clean, 43/1007872 files, 1382s0/4038912 blocks
/[ 12.958821] remoteproc1: failed to load am335x-pru0-fw
[ 12.994111] remoteproc1: request_firmware failed: -2
[ 12.999320] pru-rproc 4a334000.pru0: rproc_boot failed
[ 13.299615] remoteproc1: failed to load am335x-pru1-fw
[ 13.312562] remoteproc1: request_firmware failed: -2
[ 13.317790] pru-rproc 4a338000.pru1: rproc_boot failed

Debian GNU/Linux 8 beaglebone ttyS0

BeagleBoard.org Debian Image 2016-05-13

Support/FAQ: http://elinux.org/Beagleboard:BeagleBoneBlack_Debian

default username:password is [debian:temppwd]

The IP Address for usb0 is: 192.168.7.2

beaglebone login:

5. Logged as root, then hit Return. HINT: I tried doing this also with the Adafruit cable and a little Linux boxen using minicom. But got stumped when I couldn't log in and the keyboard seemed unresponsive and there was no response on the terminal console. Why? Because by default, minicom is set with hardware flow control enabled!!!! You must run minicom as root to configure the defaults:

$ sudo minicom -s

Select 'Serial Port Setup':

+-----[configuration]------+
| Filenames and paths |
| File transfer protocols |
| Serial port setup |
| Modem and dialing |
| Screen and keyboard |
| Save setup as dfl |
| Save setup as.. |
| Exit |
| Exit from Minicom |
+--------------------------+

Then turn off hardware flow control. Type 'f' and 'Yes' will change to 'No':

+-----------------------------------------------------------------------+
| A - Serial Device : /dev/modem |
| B - Lockfile Location : /var/lock |
| C - Callin Program : |
| D - Callout Program : |
| E - Bps/Par/Bits : 115200 8N1 |
| F - Hardware Flow Control : Yes |
| G - Software Flow Control : No |
| |
| Change which setting? |
+-----------------------------------------------------------------------+

Hit Enter (Return), then cursor down, save as default, and exit: You can then debug to your heart's content!

6. Now run connmanctl. Now here's the part where I nearly tore out the few remaining hairs on my head: For the life of me it seemed that the wifi was unresponsive and would not scan for networks. I tried doing it manually, but got an error message that the wifi hardware didn't support scanning!!! The answer, thanks to a quick check of the connmanctl man page:

tether wifi on | off ssid passphrase
Enable or disable wireless tethering, as well set the SSID and
passphrase.

You must turn tethering off for wifi! So I then issued:

connmanctl> tether wifi off
Disabled tethering for wifi
connmanctl>

7. You can then perform the rest of the connmanctl actions to set wifi:

connmanctl> scan wifi
Scan completed for wifi
connmanctl> services

KAYZEEPUP wifi_deadbeef0000_4b41595a4545505550_managed_psk

connmanctl> agent on
Agent registered

connmanctl> connect wifi_deadbeef0000_4b41595a4545505550_managed_psk
Agent RequestInput wifi_deadbeef0000_4b41595a4545505550_managed_psk
Passphrase = [ Type=psk, Requirement=mandatory, Alternates=[WPS ] ]
WPS = [ Type=wpspin, Requirement=alternate ]
Passphrase? WTGD3g3gk69lw
Connected wifi_deadbeef0000_4b41595a4545505550_managed_psk
connmanctl> quit

8. Shutdown, and removed all cables.

9. Held boot button down.

10. Rebooted and SSH'd in via wifi standalone!

Follow-on steps involved expanding the filesystem to take advantage of the (possibly) extra space on the card (and of course, the other normal apt-get update, user or timezone configuration, etc.) The good news is that this distro is a more complete release with X, a Desktop Manager, etc. The bad news is that this particular .img file only leaves about 35MB left on the root filesystem!

Not a good thing. But easily taken care of (see below).

Rant: It would be really nice to have a short step-by-step README included with each Beagleboard.org distro. Perhaps under /home/debian or /root?

Expanding the Debian GNU/Linux Filesystem on microSDHC

With only 35MB left on the card but the distribution residing in a 4GB partition on a 16BG card, the next task was to expand the root filesystem. I tried some of the techniques thrown about - including one from Beagleboard.org - nada, zip, zilch, zero... So I took the easy way out:

1. Made a little more room on the existing root filesystem:

sudo apt-get update
sudo apt purge

2. When I had about an extra 100MB, I then installed gparted:

sudo apt install gparted

3. Then started a vnc session (a vnc server, tightVNC, is already in place - thanks!):

vncserver -geometry 1280x800 :1

4. then used a vnc:// URL in my browser from another computer on the LAN with the BBGW's IP address and session ID:

vnc://192.168.1.23:5901

5. Fired up an X terminal and ran gparted. It's a snap to resize and it's done on the fly! (select the leftover space, reduce it; select the root partition, enlarge, then apply changes - bingo!)

TIP: You'll run gparted as root using sudo, but it will fail unless you allow 'other hosts' to connect to your X session. Use the xhost command to enable the connection, then run gparted as root at your X terminal client command line:

$ xhost + ; sudo gparted

Btw, both UXterm and QTerminal installed had horked font displays and wouldn't display proper keyboard characters! Fortunately Xterm worked fine. I later installed lxterminal as it works much better for my purposes (and it's what I use under Raspbian).

You may also want to set up a small swap file. I use Samsung EVO+ 32GB cards which run about a Hamilton at the local electronics store or online. These cards give me a consistent 20MBs read/write, so I'm not really concerned about life cycle or how long they will last - I always have a backup, which is as easy as sticking a card into a USB carrier and copying the root filesystem. To make a little swap file - say 512MB - equal to the BBGW's RAM:

$ sudo dd if=/dev/zero of=/swap bs=1K count=512K
524288+0 records in
524288+0 records out
536870912 bytes (537 MB) copied, 33.9637 s, 15.8 MB/s
$ sudo chown root:root /swap
$ sudo chmod 0600 /swap
$ sudo mkswap /swap
Setting up swapspace version 1, size = 524284 KiB
no label, UUID=5655bc03-837b-4531-a39f-44ea674c0449
$ sudo swapon /swap

Next, edit /etc/fstab:

$ sudo nano /etc/fstab

then add:

/swap none swap sw 0 0

and swap should be enabled on next boot:

$ free
total used free shared buffers cached
Mem: 503908 143140 360768 4952 13440 72756
-/+ buffers/cache: 56944 446964
Swap: 524284 0 524284

After the next step below I had a nice dual-boot system!

Configuring a Current Seeedstudio Release for the BeagleBone Green Wireless

Following Seeedstudio's BBGW wiki links, I found the latest .img file (BBGW-blank-debian-8.5-seeed-iot-armhf-2016-06-20-4gb.img.xz at the time of this writing), downloaded it, then decompressed, verified the sha256, and then used ddrescue on my Mac to write it to an old 4GB Samsung microsdhc. After inserting the card into the BBGW, I booted to a reflash. The BBGW signaled the reflash was complete (all USR LEDs were lit).

So now i have the latest release on the emmc! (and had to again reconfigure wifi, etc.). The output of uname and /etc/dogtag show:

$ uname -a
Linux beaglebone 4.4.12-ti-r31 #1 SMP Thu Jun 16 18:48:27 UTC 2016 armv7l GNU/Linux

$ cat /etc/dogtag
BeagleBoard.org Debian Image 2016-06-19

This is kind of a bare-bones release. No X, Desktop Manager or other goodies. But with more than 1.5GB free on the eMMC there always apt-get, right? Anyway, the very next thing i did was to install gddrescue... this was to help me at least make a halfway OK backup of a functioning system... i then backed up the emmc to an inserted microsdhc card:

sudo ddrescue --force /dev/mmcblk0 /dev/mmcblk1

Backing up the emmc to a microsdhc takes less than four minutes on the BBGW using a Class 10 card (I use Samsung EVO Plus). I then verified that the image was working by rebooting with the Boot button held down until i could see the system being booted from the card slot and not emmc - now if i do 'brick' the machine i can get right back to work and reverse the process (according to Seeed, there are boot images you can download if you don't backup) Backing up your emmc to microsdhc is a great way to keep a current copy of your system. Before you reflash your BBGW, make sure to have working backup on microsdhc. I tried a BBGW test release from 2016-06-06 and it would NOT boot from a back up. The release documented here DOES work - which is a good thing. However, it appears that this only works with an un-modified system - as soon as I made changes, then backed up, the backup would not boot. There are a host of emmc tools under /opt/scripts that bear exploring, so I am hopeful to find a good solution.

Configuring Sound on the BeagleBone Green Wireless

Gotta have tunage on these little beasties. Yea, I know, I know. "But they're for hardware projects, they're not recreational toys!"

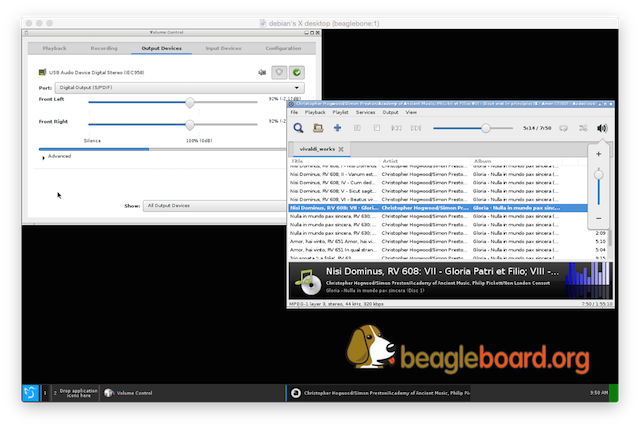
Balderdash. I like listening to music. It relaxes me. It relaxes my cat, Winston, who likes Mozart and Hayden, but can't stand Chopin (dunno why). Anyway, there's no immediately easy way to get audio output unless you stream music to another computer or set up Bluetooth audio using the BBGW's hardware and installed kernel modules. So I took the easy way out and plugged in my Turtle Beach USB audio dongle. Installed the additional pulseaudio goodies, such as the manager, control, and meters, along with my favorite .mp3 player, Audacious. Works great, and within a few minutes I was listening to some tinkling ivory via a little amplified speaker.

I also tried a Sabrent USB external stereo audio adapter (less than US$6!!!), which was recognized by the kernel as a C-Media device. Like the Turtle Beach, it was easy to configure to use with Pulse Audo - stereo controls in the mixer, etc. I like this adapter better because it is very compact - about the size of its two jacks, line out and microphone, and the sound is outstanding. This is a bargain way to easily add audio to tiny SBCs. The adapter was easily recognized and configured:

[ 949.811270] usb 1-1.3: New USB device found, idVendor=0d8c, idProduct=0014
[ 949.811326] usb 1-1.3: New USB device strings: Mfr=1, Product=2, SerialNumber=0
[ 949.811358] usb 1-1.3: Product: USB Audio Device
[ 949.811387] usb 1-1.3: Manufacturer: C-Media Electronics Inc.
[ 949.836906] input: C-Media Electronics Inc. USB Audio Device as \
/devices/platform/ocp/47400000.usb/47401c00.usb/musb-hdrc.1.auto/usb1/1-1/1-1.3/1-1.3:1.3/0003:0D8C:0014.0001/input/input1

Here is a screenshot of the Audacious music player and the Pulse Audio volume control (you'll need to select the digital output or a working USB snd output):


My next effort was an ultimately (at this point) failed attempt at configuring Bluetooth audio, something easily accomplished using the Raspberry Pi's Raspian (Debian) distro and RPi hardware. At this point it appears you must use manual configuration, as there are no gui BBGW hardware controls for either the console or X. The first step, detailed in several places on-line, is to run the 'bb-wl18xx-bluetooth' command, a shell script that controls some GPIO pins according to board model:

...

TI_AM335x_BeagleBone_Green_Wireless)
bt_gpio_en="60"
bt_port="/dev/ttyS3"
bt_settings="texas 300000"
...


Running the command resulted in:

$ sudo bb-wl18xx-bluetooth
Found a Texas Instruments' chip!
Firmware file : /lib/firmware/ti-connectivity/TIInit_11.8.32.bts
Loaded BTS script version 1
texas: changing baud rate to 3000000, flow control to 1
Device setup complete

Ah, so far, so good! Now it was time to use the bluetoothctl command:

$ sudo bluetoothctl
[NEW] Controller E0:E5:CF:7F:D2:F2 beaglebone [default]

The BBGW controller was found! Now to scan for devices:

[bluetooth]# scan on
Discovery started
[CHG] Controller E0:E5:CF:7F:D2:F2 Discovering: yes
[NEW] Device 2A:00:18:A7:A0:5B X-mini KAI2

Yes! My little BT speaker (which works great under OS X, Ubuntu, and Raspian) was discovered! Now to 'pair':

[bluetooth]# pair 2A:00:18:A7:A0:5B
Attempting to pair with 2A:00:18:A7:A0:5B
[CHG] Device 2A:00:18:A7:A0:5B Connected: yes
[CHG] Device 2A:00:18:A7:A0:5B UUIDs:
00001108-0000-1000-8000-00805f9b34fb
0000110b-0000-1000-8000-00805f9b34fb
0000110c-0000-1000-8000-00805f9b34fb
0000110e-0000-1000-8000-00805f9b34fb
0000111e-0000-1000-8000-00805f9b34fb
[CHG] Device 2A:00:18:A7:A0:5B Paired: yes
Pairing successful

Great! The speaker was paired! Now to 'trust' (which, in my mind, is sort of an absurd and useless step):

[bluetooth]# trust 2A:00:18:A7:A0:5B
[CHG] Device 2A:00:18:A7:A0:5B Trusted: yes
Changing 2A:00:18:A7:A0:5B trust succeeded

All right! Almost there! Now to connect:

[bluetooth]# connect 2A:00:18:A7:A0:5B
Attempting to connect to 2A:00:18:A7:A0:5B
Failed to connect: org.bluez.Error.Failed

@#%@#%%%!!!!! Ah well, maybe in the next release? Anyhow, I do have the little USB audio dongle and my old, trusty Turtle Beach.

Bluetooth configuration via command-line is the base minimum level of support. Hopefully Seeedstudio will come out with a more developed release (or maybe I'll try rolling in some gui support!)

Using a Webcam on the BeagleBone Green Wireless

Another device I tried on my BBGW running the Beaglebone.org Debian distro was a cheap webcam. After installing vlc, I plugged the webcam into a USB port and looked at the dmesg output:

[ 2985.250253] uvcvideo: Found UVC 1.00 device (046d:0825)
[ 2985.345500] input: UVC Camera (046d:0825) as /devices/platform/ocp/47400000.usb/47401c00.usb/musb-hdrc.1.auto/usb1/1-1/1-1.3/1-1.3:1.0/input/input4

In this case it was a Logitech C270 picked up at a local box-mart. This webcam works great under Raspbian. After launching vlc, I chose Media->Open Capture Device, then clicked the drop-down to choose /dev/video0 (created after plugging in the cam). Clicking the 'Play' button, the cam's LED light up, and vlc presented ... a black screen!

Undeterred, I quit vlc, unplugged the Logitech, and plugged in a cheap Labtec web cam purchased for a buck at a local thrift store earlier in the day (I'm a real scrounge, and find stuff like old LCD monitors for $9 or so):

[ 3321.857353] usb 1-1.4: New USB device found, idVendor=093a, idProduct=2626
[ 3321.857409] usb 1-1.4: New USB device strings: Mfr=0, Product=0, SerialNumber=0
[ 3321.870111] gspca_main: gspca_pac7302-2.14.0 probing 093a:2626
[ 3321.884442] input: gspca_pac7302 as /devices/platform/ocp/47400000.usb/47401c00.usb/musb-hdrc.1.auto/usb1/1-1/1-1.4/input/input5

After repeating my launch and vlc menu selection, when I pressed the 'Play' button vlc presented a nice little 640x480 live cam feed!

But the feed was laggy, really, really laggy (could be my lousy wifi network and other traffic, though; the screenshot is from a Mac desktop of a vnc session). So there you have it - a win for a piece of cast-off technology!

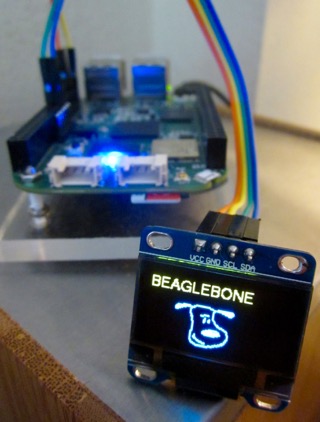
Using a 128x64 SSD1306 OLED with the Beaglebone Green Wireless

I recently scarfed one of those neato 128x64 OLEDs for about a Hamilton off the 'Net and thought it would make for a nice little system monitor on a headless SBC (single-board computer) like the RPi3 (which somehow seem to keep multiplying 'round these parts - dunno why). The OLED is one of those two-color jobbies that has a yellow area up top and the rest in blue. So i sat down one afternoon and crafted up a little Python (i'm a Python n00b, btw) to have the OLED do something useful. What's nice is that my pitiful results - i hope this can help someone out there - which work fine on the RPi, also ported easily to the BBGW. Honestly, it only took an hour or so of editing the Python script to accommodate the BBGW. BTW, I have to put out a big shout of 'thank you' to rm-hull for SSD1306 code. I followed his directions from the github source and quickly re-implemented his Python library on the BBGW.


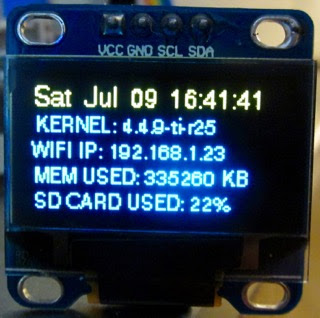
What I ended up with was a Python script that shows a series of screens displaying information such as:

kernel version,
IP address,
memory used,
wifi signal strength,
the amount of microSDHC card usage,
and the BBGW's serial number

... along with a little splash screen with a dawg. (Hint: I cheated and didn't resort to .png manipulation; I simply used a .ttf dog font - no kidding!)

Here's the important info. You'll need Python 2.7 installed. First, carefully hook up the OLED's four pins while the BBGW is powered down:

VCC -> +3V, pin 3
GND -> pin 2
SCL -> pin 19
SDA -> pin 20

Boot up, then make sure i2c support is available, although it should be enabled by default by the beaglebone.org Debian release.

The i2c device (in this case the SSD1306) showed up on bus(port) 2:

$ i2cdetect -l
i2c-0 i2c OMAP I2C adapter I2C adapter
i2c-2 i2c OMAP I2C adapter I2C adapter

I then looked at the device on the bus (note that it is recognized at address '3c' on i2c bus(port) #2 [bus #0 is reserved for capes?]):

$ i2cdetect -y -r 2
0 1 2 3 4 5 6 7 8 9 a b c d e f
00: -- -- -- -- -- -- -- -- -- -- -- -- --
10: -- -- -- -- -- -- -- -- -- -- -- -- -- -- -- --
20: -- -- -- -- -- -- -- -- -- -- -- -- -- -- -- --
30: -- -- -- -- -- -- -- -- -- -- -- -- 3c -- -- --
40: -- -- -- -- -- -- -- -- -- -- -- -- -- -- -- --
50: -- -- -- -- UU UU UU UU -- -- -- -- -- -- -- --
60: -- -- -- -- -- -- -- -- -- -- -- -- -- -- -- --
70: -- -- -- -- -- -- -- --

After seeing the OLED on the bus, I then installed Mr. Hull's wonderful SSD1306 Python library support - search for "rm-hull github ssd1306" and you can download the library, software, README and examples. Follow the directions! You'll need to install a variety of Python support libraries to get a working display. You'll also need to edit the examples to fit the adapter address on the BBGW. For example, use:

device = ssd1306(port=2, address=0x3C)

Then you can add fonts, etc. and have fun! I used a number from Adafruit's SSD1306 libraries. Running an OLED on the BBGW is a very inexpensive way to have system and other information continually displayed. I like that Python scripting is interactive - a simple edit of a script, then running the program eliminates the compile cycle - almost like the days of BASIC programming! I like that you can quickly new features, such as wifi signal strength readings:


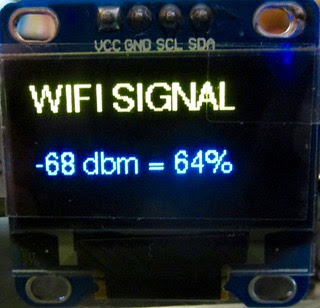
I put most of the code together in an afternoon with a little tweaking the next day (such as wifi signal strength). To display the local weather I use a simple shell script that retrieves current conditions from Accuweather based on a zip code query. If you'd like your script to run upon each boot, you'll need to create a short systemd entry. However, first make sure to 'hardwire' the font pathnames in the source code; IOW, specify the exact locations of the fonts. For example:

font = ImageFont.truetype('/home/debian/Downloads/ssd1306-master/FreeSans.ttf', 12)

Next, as root, create a short systemd entry under /lib/systemd/system. I used the name ssd1306.service, which contains:

[Unit]
Description=SSD1306 OLED

[Service]
ExecStart=/home/debian/Downloads/ssd1306-master/bbgwssd.py

[Install]
WantedBy=multi-user.target

Note that the ExecStart entry gives the exact location of the Python script. The WantedBy entry will have the service started upon every reboot. You can then 'install' the service by going to the /lib/systemd/system directory, as again as root, using the systemctl command:

$ sudo systemctl enable ssd1306.service

You can test your BBGW's new OLED service by using the start option:

$ sudo systemctl start ssd1306.service

After you reboot you'll have your BBGW displaying its system stats!

Nitpicks About the BeagleBone Green Wireless

The BBGW needs more and better documentation. The BBGW's current System Reference Manual is somewhat lacking (32 pages vs the more than 130 pages for the Beaglebone Black). BTW, "Force to boot from Micro SD Card or Switch the Wi-Fi mode between AP and station mode " is the description for the Boot button on the Seeedstudio BBGW wiki, but there is NOTHING in the BBGW System Reference manual regarding this behavior - and instead, details are given regarding a boot order - including USB??? (have not tried this yet). Check out the wiki for related links.

An install of vnc4server and then a requisite window manager/desktop system - lxde and lxterminal, along with the midori browser (from Debian's Jessie backports, which only required a simple removal of a comment hashtag from /etc/apt/sources.list) seem to work well.

Finally, I highly recommend getting a 3V FTDI UART USB cable to use serial input/output login - very helpful to see what's going on during an initial boot of a new distro or install. Make sure it is a 3V cable!!!

I hope you find this info useful. I really like my BBGW and I think you will too!