Monday, June 19, 2017

Bosch Dieselgate Settlement - W00t!

Thanks, Bosch! We really appreciate the extra money. It has provided us with two new VHF Tri-band transceivers, small whip antennas, a new dive watch, and a few lunches and dinners this week!


We also look forward to more than $2,000 next year for our Phase 2 Emissions Modification payment!

And just today, we received our Phase II emissions modification letter:

And, not long after, we have finally received the last third of our payment from VW! This means that we have received more than $7,000 back on our purchase and that we acquired a 2015 VW diesel station wagon for $18,500 new - truly a wonderful deal!

We're going to drive the wheels off our wagen - it will just start to break in at the 50,000-mile mark, and many owners get more than 200,000 miles out of their vehicles.

Sunday, June 4, 2017

Tips for Running Raspbian PIXEL on the Apple Macbook Air (2015 edition)

UPDATE: There is a new version of the Raspbian PIXEL desktop for Macs, personally verified to work fine on the latest Macbook Air:

Raspberry Pi Desktop


OLD VERSION:

Great news! There is a GNU/Linux alternative to Mac OS X for older Macs, and i've finally found the right distro!

I've been able to create a viable alternative using Raspbian's PIXEL for my Macbook Air (2015 vintage) on a Samsung 64GB compact thumbdrive.

PIXEL 1.1 Dec 2016 w/md5sums

This is the *only* working distro with wifi, sound, printing, and persistence i've been able to put together for my little Apple notebook. I have tried a number of others - the only other one that comes close is a 64-bit version of Anti-X:

antiX for the Mac

(use the 64-bit version - the 32-bit version did NOT work for me!)

Live GNU/Linux distros are a great way to test before an install. However, the PIXEL distro at this point is only live - BUT, you can create a 'persistent' version on a USB boot stick (compact thumbdrive, sdhc in a carrier, etc.) by following the following directions:
 step-by-step to making a persistent USB boot stick

 Mousepad Tweak

Also, to make life nicer with the Macbook Air's trackpad, i created a file named mouse.sh (made executable by using chmod +x), containing:
#!/bin/sh
/usr/bin/synclient TapButton1=1 TapButton2=3 TapButton3=2 ClickTime=1
The file is saved under /usr/local/bin - then in the file $HOME/.config/lxsession/LXDE-pi/autostart:

@lxpanel --profile LXDE-pi
@pcmanfm --desktop --profile LXDE-pi
@xscreensaver -no-splash
@point-rpi
/usr/local/bin/mouse.sh


This will be used upon log in and provides:

1. button assignments
2. two-finger right-clicking
3. three-finger middle mouse button event
4. tap-to-click

Webcam

Alas, the internal webcam/camera on the Macbook Air is not recognized. However, i plugged in an inexpensive Logitech C270, and it was recognized as /dev/video0 - which meant that it worked in VLC and Cheese. I have yet to explore video chat, aside from crashing firefox-esr when attempting a Facebook video chat (ain't gonna work - may try bumping up to the latest firefox outside of the Debian repos)

Even so, I am quite happy with PIXEL - best out-of-the-box experience!


Friday, May 5, 2017

Hubs 'N DACs

Having a lot of fun lately with some extra Raspberry Pi Zeros, some Zero hubs, and several DACs to build LAN-connected Internet radio and .mp3 players. I like the Zero footprint, and as you all know, the Raspberry Pi Zero and Zero W are great little computers that don't ding your wallet - by themselves.

But with no audio out and limited USB, you'll need to add a few items to your project if you want some tunage and connectivity. The Raspberry Pi Zero W handily provides wifi - a real bargain $10 computer that I predict will introduce many new products and a new standard in SBCs, but again, you'll need to add audio for any sound-related project. And if you want to host additional devices, such as thumb drives, mouse, or keyboard, you'll need some additional USB ports.

Audio Solutions

I suppose the cheapest way to get audio on the Zero is through a USB audio dongle. You can find these devices - which provide audio in and audio out connectors - everywhere for about a Lincoln (US$5). They work well with GNU/Linux, and most are C-Media devices easily recognized and configured for use by the kernel (gone are those terrible days of having to rebuild the kernel every time install a new sound card!)
The problem is that you will most likely still need the sound amplified in order to play music on your speakers. Some dongles offer mute buttons, and some speakers are USB powered, but then only offer physical controls for volume, bass, etc.

Getting your hands on an amplifier for a stereo speaker project is kinda easy. I have scavenged a number of small amplifier boards from 3V battery powered speakers found in thrift stores and at flea markets. You can also buy one of the boards Adafruit sells to interface with your Zero's audio output.

Digital-to-Analog-Converters, or DACs, come in several form factors and flavors for the Raspberry Pi family. I have several: Pimoroni's PHAT DAC, a PiZeroAudio DAC, and Adafruit's Speakerbonnet.

Zero Hubs

Getting additional USB ports onto your Zero can be accomplished by using a hub. Like cheap audio amps, I have also scavenged old 4-port dongle hubs for Zero projects, such as this FrankenZero, a complete Desktop computer with wifi, sound, and a VGA port:

Hardware developers have come up with some nice Zero-footprint hubs at a reasonable cost. Putting together some of the required bits for an audio project that will work well with speakers can be interesting! Here is a MakerSpot hub (highly recommended), with a Pimoroni PHAT DAC, and an Adafruit 7W audio amplifier - great sound out of this one:

Amplified sound is provided by the screw jacks on the side of the amp board, with power (5V) supplied by the Zero's GPIO bus. The DAC's output is drawn from its RCA connectors:

I've incorporated another hub, the new Hubpixed, which works with the rpi0 1.3 and W, and have an inexpensive DAC attached - note there is no amplifier! :
But my favorite solution is the Adafruit Stereo Speaker Bonnet, which has the DAC and amp on a single board, and also provides your RPi's i2c and power GPIO pins in a separate area on the board - brilliant! i have this board installed in a Western Digital PiDrive enclosure on an RPi3 - great sound out of this one!

Here are some tips and tricks with the speaker bonnet:

1. i have found that cutting a 4-pin Grove connector works great as a JST-4 plug - this makes hooking up stereo wires a lot easier or to route the stereo lines out to my RPi's enclosure

2. after a bit of research and command-line foo, i found the proper incantation to play video during Raspbian Pixel desktop sessions on an RPi3 and have the audio routed through the speaker bonnet (great sound!)

hint: vlc, as currently distributed, won't work! you must use omxplayer and you must specify the Alsa card number of the bonnet... for example:

omxplayer -b -o alsa:hw:0,0 ManBearPig.avi

(the -b option creates a black background in case your video is smaller than your desktop)

at some time i'm going to try to recompile vlc for hardware acceleration... i understand that v2.2.4 will build properly at this point in time...

3. typing the omxplayer command line works, but is a pain in the ass if you're kicking back on the couch and using a Logitech remote keyboard and mouse; in this case, you'll want to create an association using a right-click on a movie file in the pcmanfm (file manager) window:
you'll want to make sure that omxplayer is launched in a terminal, or you'll lose control of the program once the video starts playing (i.e., no volume control, pausing, or quitting); after you click 'OK' you will see the 'doit' option when you right-click your movie file - this is the easiest way for me to launch omxplayer without typing a command line.

tip: you'll need to create this custom launch option separately for .avi or .mp4 files - to save a hassle and time, rename your .mkv files to end in .avi (they're the same file internally - at least this has been my experience).

Wednesday, May 3, 2017

WD PiDrive Node Zero wireless Zero Upgrade!

Just snagged a WD PiDrive Node Zero from WD today! I had also ordered the enclosure.


 This nice little compact board comes with a 300GB WD USB drive *and* an RPi Zero!
 In just a couple minutes I extracted the RPi0 out of the node and installed a new RPi0W; extraction was a careful affair, but easily accomplished - the Zero is attached by its two micro-usb ports, but i had to first use an H1.3 security bit to remove the four screws holding the Zero in the add-on USB board (don't know why WD didn't use small Phillips heads)


i had previously configured a recent Raspbian Pixel distro on the RPi0W's sdhc, so i just kept it in and powered up the Node Zero.
My new little computer runs great! i use a 2.4A USB power supply... as a bonus:
- the WD Node Zero came with a micro->HDMI stubby cable (not needed, but nice to have)
- the WD Node Zero offers two USB ports (handy, but not necessary thanks to the new wifi capabilities
- the enclosure came with a small torx screwdriver!
- *and* i now have a spare Zero to play with!


Sunday, January 1, 2017

Shaving

This page will document some of my shaving accessories. I did have a bit of a collection of straight razors at one time, but downsized about four years ago and sold most of them off. Nowadays I use vintage Gillette double-edged adjustable safety razors - much safer!

Here's a treasure given to me by my father-in-law: His 1960 gold-plated Gillette Toggle!
More razors will be added as I take pictures.

Tuesday, December 27, 2016

Swim Watches

Being an avid early-morning swimmer, I'm always on the lookout for a nice water-resistant watch with a readable face. I started out using a cheap Casio MRW200H-1EV (they come in many color combos, but my favorite was the black dial with yellow numerals). Battery life on this watch was not so good as i found i had to replace the battery at least once a year (something i can do myself).

My next step up was to another Casio, the classic, and i think, bargain 200m dive watch, the MDV106-1A - beefy, with twice the battery life, screwback, good readability. I used one for at least a year. Alas, i was disappointed in the lume.

I also like the Seiko SKX007:


And then i discovered the Seiko Monsters. Big, beefy automatics with hand-winding and hacking (ability to set the watch to the second) in the 2nd generation, which uses a 4R36 movement. Great watch, outstanding lume.

I snagged a used one for about a Franklin. It's my go-to swim watch for the early morning:
More recently, i discovered that there is a real bargain automatic dive watch with hand-wind capability and fabulous accuracy out of the box: the Vostok Amphibia, made in the Russian Federation, and based on a late 60s design:

Like the cheap Casios, these watches come in a variety of configurations, dials, bezels, etc. Many parts are interchangeable, and best of all, the watches are less than US$80 shipped, with hand-wind only for US$30 less!

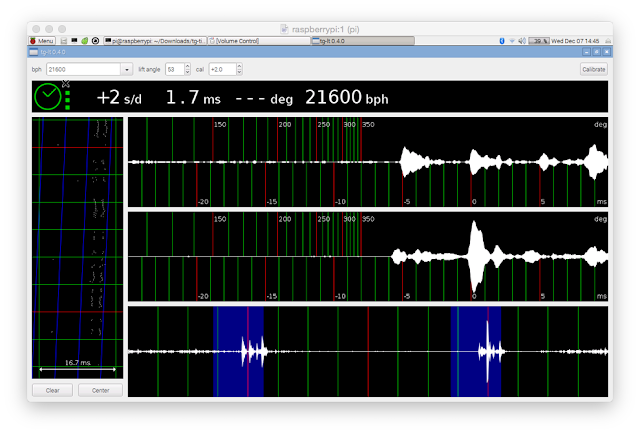
I really didn't believe the touted accuracy, so I slapped one of mine onto a C270 webcam's mic and ran the Tg timegrapher client under CrossOver on my MacAir running OS X:
Nice! Note that unlike the Seiko, which has a 53-degree lift angle and 21,600 beats per hour, the Amphibia has a 42-degree lift angle and 19,800 beats per hour. Even so, the accuracy of +/-5 seconds per day (more or less according to wear, temperature, etc.) is astounding!
And the newest addition to the clan - an orange scuba dude with a modded bezel and nato strap:

And here's a new Amphibia modded with a new bezel that i'm going to call my 'Diet Pepsi' (after a Seiko SKX009):


and a latest acquisition: i think this is one of the most attractive and readable of the Vostok Amphibian dials; i slapped on a dragontail Pepsi bezel and a blue 22 G10 (nato) strap:


So now I'm very happy! Anyone want a couple cheap quartz swim watches? I'm done changing batteries. Even though the Amphibia only has a 31-hour reserve and the Seiko Monsters sport a 40-hour reserve, hand-winding keeps these babies running in tip-top shape and on time!

and my very latest - the wonderfully rare SKX011J1!

Saturday, December 24, 2016

Merry Christmas

Merry Christmas from the Gulf of Mexico!


To all GNU/Linux users - have a great time with family and friends and fabulous 2017!

Wednesday, December 7, 2016

Tg Timegrapher on the Raspberry Pi

Marcello Mamino's Tg timegrapher is a fabulous piece of software you can use to maintain your automatic watch's accuracy or to diagnose and determine if service is needed. This program uses sound analysis and 'listens' to your watch, then reports information about how it is running. Again, many folks will simply use Tg in order to get their watch to the greatest degree of accuracy (shortest loss/gain of seconds per day). This short post will show you my simple setup on how I use Tg with a Raspberry Pi 3.

NOTE: For a detailed explanation of many of Tg's features, to learn how to interpret the graphical and digital output, and for training on how to use a timegrapher, get this *very* helpful document:

Witschi Training Course

To install tg, the first step is to download and build the software (I don't think Tg is in Debian mainstream - yet!). You'll need a few extra software packages and libraries, along with, of course, the normal development tools. Simply follow the instructions on Tg's page or Marcello's github page and you'll see that Tg builds and installs under Raspbian quite easily.

You'll also need an inexpensive quartz watch, and input microphone - i use a Logitech C270 webcam for a mic - and of course, your automatic watch. Please note that I am an amateur watch person, so my horological knowledge is quite in the n00b status.

One additional piece of software I found handy was Pulseaudio's pavucontrol, a gui client interface to sound devices on my Raspbian system. After installation, I checked the mic and its input level:
Calibrate

The first step is to calibrate Tg to your sound card. More details about this process may be found in this msg. Simply clamp your quartz watch with its back to the mic input. Run Tg using the tg-timer command, then click the Calibrate button. Then sit back, watch the dialog, wait until the calibration finishes, and you'll see Tg automatically enter the offset value. In my case, the C270 mic need a +2 offset. A CMedia USB sound dongle required a +3.6. Your mic may be different!

Enter Settings

Next, you'll need the 'lift angle' and beats per hour for your watch. Now understand that I'm a watch n00b, but as I have read, the lift angle is "the time the balance is in contact with the pallet fork." Most watches use 52, but my Seiko in this example uses 53, and the bph setting is 21,600. After clamping the watch onto your mic, let Tg run!

Simple Use of Tg

It's best to let the program run for a minute or so in each of six different watch positions: dial up/down, crown up/down/left/right. Keep a notepad handy and note any different readings in the s/d or seconds per day. You can use these values and orientation to 'fine-tune' your watch's accuracy once you get it running the way you like.

Here is the program running on one of my RPi3's with a 3.5" TFT. My Seiko SKX007 is clamped to the C270 and the session is displayed on a Screen Sharing VNC session on my Macbook Air in the background (Tg's dialog is too big for 320x240 resolution on the TFT):
Using this program, I've been able to achieve a decent level accuracy for my watch (temperature, position, etc. will all have an effect):

Tg offers a bit more info than i've described here. I'm not knowledgeable enough about horology to expound on its uses, so suffice to say that i simply enjoy using the program. It's a simple way for me to enjoy my inexpensive Seiko automatics.

Saturday, December 3, 2016

Tg: Open-Source Timegrapher

I love open-source software. Thanks to Marcello Mamino's Tg timegrapher, you can enjoy using your favorite computer and soundcard to help maintain your automatic watch's accuracy or to diagnose and determine if service is needed.

I'm an amateur, but I like professional tools, and this software, which runs on everything from a small Raspberry Pi to machine powered by the Beast of Redmond, presents an inside view of your watch's movement - it's  not an x-ray, but a sophisticated sound analysis!

Here we see a Seiko SRP615, which uses a 4R36 movement:

The dialog shows a beat rate (+/- seconds per day),  amplitude (orientation), beat error (lineup of tic/toc) and beat number (here, 21,600 beats per hour). Excellent accuracy is assumed on first glance, but you have to run the program with the watch in different positions for a better idea!

You can download and build the client from source, install binaries, or as I did, install non-native binaries and run the client in emulation under CrossOver for the Mac.

The first task is to 'calibrate' the software to your soundcard. Clamp a quartz watch onto your input mic (I used a Logitech webcam), then click the Calibrate button. Let Tg collect data and it will eventually display an offset value to use when running an analysis of your automatic watch. You'll want to make sure that the input sound is 'clean' (represented on the bottom line of the picture) so you'll get best results, but Tg is pretty robust - it will work!

You can use the 's/d' values to determine if your watch is running too slow or too fast. You'll want to see the differences between these values with the watch in different positions (dial up/down, crown up/down, etc.) Then crack your caseback, adjust, and check again. This can save a lot of time instead of doing the adjustment, then letting the watch run for two days or so.

Have fun, and thanks, Marcello!

btw, it also appears that my manual regulation efforts, conducted before trying this software, were pretty successful with my skx007:


Friday, November 4, 2016

Finally - A Working Sensor Recovery Python Script

Using a Raspberry Pi and learning how to read sensors via GPIO pins using Python is a wonderful learning experience. One of the important things to learn when melding hardware and software is how to 'bullet proof' against system and/or sensor failure.

I initially tried to craft a simple system reboot in response to a failure of a Python 'try' statement. Our power down here in the near Tropics, despite being within the CONUS sometimes is almost Third World. I think Baghdad must have a better electric grid than the one run here by Duke Energy.

Anyhow, I finally came up with a working Python function to reboot my Raspberry Pi 3B in the event of a BME280 sensor read failure. Without this, the system would hang and the script would fail to return to a working state.

So here's the snippet. It parses out of the currently running script to reboot the system and hopefully, restore a working order, as evidenced by yesterday's intermittent power outages/voltage fluctuations - here's the logging output (saved to a lighttpd LAN-readable Web page):

2016-11-03 02:10 error reading sensor - rebooting
2016-11-03 02:20 error reading sensor - rebooting
2016-11-03 02:31 67.6 22.7 100.0
2016-11-03 02:41 error reading sensor - rebooting
2016-11-03 02:51 67.6 22.7 100.0
2016-11-03 03:01 error reading sensor - rebooting
2016-11-03 03:11 67.6 22.7 100.0
2016-11-03 03:21 error reading sensor - rebooting
2016-11-03 03:31 67.6 22.7 100.0
2016-11-03 03:41 error reading sensor - rebooting
2016-11-03 03:52 67.6 22.7 100.0
2016-11-03 04:02 error reading sensor - rebooting
2016-11-03 04:12 67.6 22.7 100.0
2016-11-03 04:22 error reading sensor - rebooting
2016-11-03 04:32 error reading sensor - rebooting
2016-11-03 04:44 error reading sensor - rebooting
2016-11-03 04:54 error reading sensor - rebooting
2016-11-03 05:04 67.6 22.7 100.0
2016-11-03 05:14 error reading sensor - rebooting
2016-11-03 05:25 67.6 22.7 100.0
2016-11-03 05:35 error reading sensor - rebooting
2016-11-03 05:45 67.6 22.7 100.0
2016-11-03 05:55 error reading sensor - rebooting
2016-11-03 06:05 67.6 22.7 100.0
2016-11-03 06:15 error reading sensor - rebooting
2016-11-03 06:25 error reading sensor - rebooting
2016-11-03 06:36 error reading sensor - rebooting
2016-11-03 06:46 error reading sensor - rebooting
2016-11-03 06:56 67.6 22.7 100.0
2016-11-03 07:06 error reading sensor - rebooting
2016-11-03 07:16 69.7 30.2 58.9

As you can see, things started going awry at 0200. The function sets a reboot after 10 minutes. Bogus sensor readings continued until 0716, and the system has been running fine since then. Here's the code snippet/function. I hope it helps you!

def reboot():
  text_file = open("/var/www/html/weather.txt", "a")
  text_file.write(str(datetime.now().strftime('%F %H:%M ')))
  text_file.write("error reading sensor - rebooting\n")
  text_file.close()
  time.sleep(600)
  cmd = "/usr/bin/sudo /sbin/shutdown -r now"
  import subprocess
  process = subprocess.Popen(cmd.split(), stdout=subprocess.PIPE)
  output = process.communicate()[0]

  return  "%s" % output

The function is called like this:

# test bus write
  try:
        bus.write_byte_data(addr, REG_CONTROL, control)
  except IOError:
        reboot()


or like this:

# Read temperature/pressure/humidity
  try:
        data = bus.read_i2c_block_data(addr, REG_DATA, 8)
  except IOError:
        reboot()


Have a happy!

Monday, October 3, 2016

Pogo-pin Powered Pi Ports!

Got a little box in the mail today - a present for one of my Raspberry Pi Zeros:
 Nestled inside were two packages. On the left, a 5V 2.4A switching power supply with a power-switch USB->micro usb connection cord:
The tasty treat inside the little box is my new 4-port USB hub for a Zero:

As you can see, the good folks at MakerSpot also included nylon standoffs with screws and nuts! Putting the who shebang together was easy, and you can see the precision of the soldering points and pogo pins:
The only bad thing i might say about this product is that there was no documentation - just the little business card.
This hub makes a nice compact computer, ready for wifi, tunage, or flash storage! Booting up shows the following info:

[Mon Oct  3 13:15:28 2016] usb 1-1: New USB device found, idVendor=1a40, idProduct=0101
[Mon Oct  3 13:15:28 2016] usb 1-1: New USB device strings: Mfr=0, Product=1, SerialNumber=0
[Mon Oct  3 13:15:28 2016] usb 1-1: Product: USB 2.0 Hub
[Mon Oct  3 13:15:28 2016] hub 1-1:1.0: USB hub found
[Mon Oct  3 13:15:28 2016] hub 1-1:1.0: 4 ports detected
[Mon Oct  3 13:15:28 2016] usb 1-1.1: new high-speed USB device number 3 using dwc_otg


The vendor/device id maps out to:

1a40  Terminus Technology Inc.
        0101  Hub

One of the downsides to no included info is that while generally there is a caution to only power the Zero (when the hub is attached) through the hub's micro-usb port or the Zero, but NOT BOTH - bad things could happen!  However, according to the seller:

"has built-in a 2-way back-powering circuit to protect against power being plugged into the Pi Zero and the Stackable USB Hub simultaneously."

Not bad for US$17 with free shipping! Nice!

Wednesday, September 21, 2016

VW Dieselgate

Update: It's raining money! Looks like another check, in the amount of $350 is coming our way! This diesel wagon is the gift that keeps on giving!


Update: the software modification for Phase 1 results in great mileage - nearly 40mpg in combined city/hwy driving - and the $4,622 check from VW is a nice bonus... also, we just got word that Bosch is going to send out a check for $350 for its part in the settlement - that's about 6,000 miles of free diesel for our 2015 Golf TDI S DSG Sportwagen! EXCELLENT!!! and sometime this year there will be a hardware sensor update which will net us another check for over $2,000!!! W00T!!!! 

Update: Phase 1 Emissions Modification complete! Received and EFT of $4,622.22 - thanks, VW!!! Here's the sticker:


Update: here's a pic for a fellow on the tdiclub forum who is experiencing some constant fan noise... hopefully this pic, which matches his engine, may alleviate thought of the cabling being a problem:


Update: Just filled up Von Diesel for less than $17! We'll track the mileage to see how well the new mod does on fuel consumption:

Update: We just had the Phase 1 Emissions Modification done! here's what the car menu says:

It's going to rain money Real Soon Now... after purchasing our wonderful 2015 Volkswagen Golf TDI S Sportwagen, we have received $1,000 in dealer and cash debit cards, and we'll now be getting more than $4,250 for an electronics control unit re-flash; 18 months later, we'll get another check for more than $2,500... this means we bought the equivalent of a BMW diesel station wagon ($44.5K MSRP) for $18.5K!!! w00t!

now we're just waiting for uploaded document approval and Oct. 18th...


Saturday, September 3, 2016

IOError Exception Handling for a BMP180 Temperature & Barometric Sensor


THE PROJECT:

I recently set up a mini 'weather' recorder to make inside and outside temps, inside humidity and general barometric pressure readings available on an SSD1306 .96" yellow-blue OLED. The project uses a Raspberry Pi Zero, BMP280, OLED, and cheap Homeless Despot plastic junction box for the inside 'monitor.' In the garage, attached to a wall next to the washer and dryer, a Raspberry Pi 3 with an 18" i2c cable fed outside through the concrete, reads data from a BMP180 housed in a cut piece of reinforced tubing for protection from rain.

The BMP180 data is read every 10 minutes and logged to a file published via a lighttpd Web page on the 192.168.1.XX network. The inside junction box monitor strips off temperature and barometric pressure readings from the Web server, then combines the data with data from a BME280 via i2C off the Zero.

The result is a nice little display with date and time, along with inside and outside temps, humidity and barometric pressure.

THE PROBLEM:

So far I've had two BME280s fail when used outside. I do not know if they are Bosch Sensortec units (I doubt they are as the sensors are of Asian origin). Both have 'come back to life' when used inside. I'm guessing that the sensors are not tolerant of either high temps (90F+) or high humidity (90%+). I have ordered a set of four more, along with a 'supposed' 'real' Bosch unit from Adafruit. We shall see.

The problem is that I also had the BMP180 (installed outside) fail once or twice. Due to my n00b Python skills and the piss-poor example code on the Internet for these sensors, once a read hits an I/O error in Python, game over for the monitoring code - the script bombs and the process halts.

What to do?

Well, I put in place some error-checking, and we'll see if some Python exception handling might do the trick. I first looked for the very first instance in the logging script in which the i2c device (i.e., the sensor) is being accessed, then put in a piece of exception handling. I found that with the BMP180, simply rebooting the RPi3 worked to restore functionality. The code tests a write (or read), and if not successful, waits 10 minutes before rebooting. This *should* allow SSH access to fix or replace the sensor or shut down the script.

The first part is to use Python's 'try':

 try:
        cal = bus.read_i2c_block_data(addr, REG_CALIB, 22)
  except IOError:
        reboot()


NOTE: the below reboot() function does not work! see a later posting regarding how to properly initiate a reboot process!

 The next is to call a reboot function:

def reboot():
  text_file = open("/home/pi/Downloads/ssd1306-master/error.txt", "a")
  text_file.write(str(datetime.now().strftime('%F %H:%M ')))
  text_file.write("error reading sensor - rebooting\n")
  text_file.close()
  time.sleep(600)
  cmd = "sudo reboot"
  err = os.popen(cmd).read()
  strerr = str(err)
  return  "%s" % strerr.rstrip('\r\n')


 I use the Python try in the first instance of reading or writing the sensor. There are multiple instances in my script, so I guess I should sprinkle these liberally at each instance?

Anyway, ever since I modified my script, guess what? That's right, no problems. Rock solid readings every 10 minutes for nearly a week. Perhaps the problem is voltage related? Who knows?


Thursday, August 25, 2016

Best MicroSDHC for Beaglebone and Raspberry Pi

yep, here it is:


don't waste your money on lesser or more expensive brands... i have used these for months on end, even in an RPi3 running 24/7, and have yet to have one fail... Sandisk? Transcend? Kingston? ackpht! i have had failures with all those...

also, make sure not to get burned on counterfeits - Asian scum have infiltrated the manufacturer and distributor chains at Amazon and mom-and-pop cellphone stores...

that said, i can generally find these for US$10.99-$12.99 at a local box-mart electronics place with the initials 'bravo bravo' (you know who i'm talking about, right?)

UPDATE: finally, after more than two years' uptime, my sdhc shit the bed after a power surge here at the casa - always, always keep an update/copy on hand - cheap insurance - it was my internet radio/music server/thermal printer and i was able to get back up to speed in less than two minutes!

Ultimate Cheap Desktop Computer


here's the ultimate cheap desktop computer - i attached this to a $9 LCD monitor from a local thrift store for quick computing...

why?

because i can!

Raspberry Pi Zero (1.3)
$5 USB sound card
$12 Ableconn HDMI->VGA adapter
junk box Belkin wifi adapter
junk box 4-port USB hub
scrap piece from a crappy RPi case

works great!

Monday, August 22, 2016

Logging BME280 Weather Data

LATEST UPDATE: a replacement bme280 has been installed and has been running with no problems for a day or so; the 'failed' unit apparently came back to life and has been running inside with no problem - one unit reads 10 percent too high on humidity - i'm wondering if these aren't Bosch Sensortec units?

UPDATE: the bme280 sensor FAILED after four hours of use and queries on one-minute intervals; i'm disappointed, but may try another one to see if it was an anomaly (hey, shit happens, right?)

fortunately, i had a spare bmp180 on hand, and have put that into use instead - we'll see how it holds up... i'm sure i'm not the first n00b to run across sensor hardware failures  - i've even seen pictures of a bme280 melted from what i can only assume is an over- or reverse-voltage run...

:-)

just spent a bit of a morning crafting a logging script to read bme280 sensor data... the file has a format like this:

2016-08-22 12:17 78.80 30.14 52.60
2016-08-22 12:17 78.33 30.14 52.57
2016-08-22 12:18 78.28 30.14 52.56
...
  
the bme280 is an interesting sensor that returns temperature, barometric pressure and humidty...

HOWEVER, many users report that the temperature runs about 4F higher than that reported by most other sensors... and i found this to be true, as i gauged the bme280's temp readout against a bmp180 and an LCD digital thermometer... in light of this, i've included a 4-degree 'correction' in the conversion code in the script - just so you know why

i installed the lighttpd web server on a Raspberry Pi 2, with the sensor attached and fed out to the side of the garage... the script logs data once a minute (the log will grow to 50MB over the course of a year)... current weather info can be retrieved via a simple one-liner shell script:


#!/bin/sh
# retrieve weather info from data log
# 3 - temperature
# 4 - barometric pressure
# 5 - relative humidity
curl http://192.168.1.20/weather.txt -s -d ascii | tail -1 | cut -f $1 -d ' '


here's the logging script in Python:

#!/usr/bin/python
# version 0.1 - bme280 data reader and logger
# 082216
# added 1-minute logging
#
# data fields:
#     DATE         TEMP  BARO  HUMID
# YYYY-MM-DD HH:MM TT.TT PP.PP HH.HH

import smbus
import time
from datetime import datetime
from ctypes import c_short
from ctypes import c_byte
from ctypes import c_ubyte

DEVICE = 0x76 # Default device I2C address

bus = smbus.SMBus(1) # Rev 2 Pi, Pi 2 & Pi 3 uses bus 1
                     # Rev 1 Pi uses bus 0

def getShort(data, index):
  # return two bytes from data as a signed 16-bit value
  return c_short((data[index+1] << 8) + data[index]).value

def getUShort(data, index):
  # return two bytes from data as an unsigned 16-bit value
  return (data[index+1] << 8) + data[index]


def getChar(data,index):
  # return one byte from data as a signed char
  result = data[index]
  if result > 127:
    result -= 256
  return result

def getUChar(data,index):
  # return one byte from data as an unsigned char
  result =  data[index] & 0xFF
  return result

def readBME280ID(addr=DEVICE):
  # Chip ID Register Address
  REG_ID     = 0xD0
  (chip_id, chip_version) = bus.read_i2c_block_data(addr, REG_ID, 2)
  return (chip_id, chip_version)

def readBME280All(addr=DEVICE):
  # Register Addresses
  REG_DATA = 0xF7
  REG_CONTROL = 0xF4
  REG_CONFIG  = 0xF5

  REG_HUM_MSB = 0xFD
  REG_HUM_LSB = 0xFE

  # Oversample setting - page 27
  OVERSAMPLE_TEMP = 2
  OVERSAMPLE_PRES = 2
  MODE = 1

  control = OVERSAMPLE_TEMP<<5 | OVERSAMPLE_PRES<<2 | MODE
  bus.write_byte_data(addr, REG_CONTROL, control)


  # Read blocks of calibration data from EEPROM
  # See Page 22 data sheet
  cal1 = bus.read_i2c_block_data(addr, 0x88, 24)
  cal2 = bus.read_i2c_block_data(addr, 0xA1, 1)
  cal3 = bus.read_i2c_block_data(addr, 0xE1, 7)

  # Convert byte data to word values
  dig_T1 = getUShort(cal1, 0)
  dig_T2 = getShort(cal1, 2)
  dig_T3 = getShort(cal1, 4)

  dig_P1 = getUShort(cal1, 6)
  dig_P2 = getShort(cal1, 8)
  dig_P3 = getShort(cal1, 10)
  dig_P4 = getShort(cal1, 12)
  dig_P5 = getShort(cal1, 14)
  dig_P6 = getShort(cal1, 16)
  dig_P7 = getShort(cal1, 18)
  dig_P8 = getShort(cal1, 20)
  dig_P9 = getShort(cal1, 22)

  dig_H1 = getUChar(cal2, 0)
  dig_H2 = getShort(cal3, 0)
  dig_H3 = getUChar(cal3, 2)

  dig_H4 = getChar(cal3, 3)
  dig_H4 = (dig_H4 << 24) >> 20
  dig_H4 = dig_H4 | (getChar(cal3, 4) & 0x0F)

  dig_H5 = getChar(cal3, 5)
  dig_H5 = (dig_H5 << 24) >> 20
  dig_H5 = dig_H5 | (getUChar(cal3, 4) >> 4 & 0x0F)

  dig_H6 = getChar(cal3, 6)


  # Read temperature/pressure/humidity
  data = bus.read_i2c_block_data(addr, REG_DATA, 8)
  pres_raw = (data[0] << 12) | (data[1] << 4) | (data[2] >> 4)
  temp_raw = (data[3] << 12) | (data[4] << 4) | (data[5] >> 4)
  hum_raw = (data[6] << 8) | data[7]

  #Refine temperature
  var1 = ((((temp_raw>>3)-(dig_T1<<1)))*(dig_T2)) >> 11^M  var2 = (((((temp_raw>>4) - (dig_T1)) * ((temp_raw>>4) - (dig_T1))) >> 12) * (dig_T3)) >> 14
  t_fine = var1+var2
  temperature = float(((t_fine * 5) + 128) >> 8);

  # Refine pressure and adjust for temperature
  var1 = t_fine / 2.0 - 64000.0
  var2 = var1 * var1 * dig_P6 / 32768.0
  var2 = var2 + var1 * dig_P5 * 2.0
  var2 = var2 / 4.0 + dig_P4 * 65536.0
  var1 = (dig_P3 * var1 * var1 / 524288.0 + dig_P2 * var1) / 524288.0
  var1 = (1.0 + var1 / 32768.0) * dig_P1
  if var1 == 0:
    pressure=0
  else:
    pressure = 1048576.0 - pres_raw
    pressure = ((pressure - var2 / 4096.0) * 6250.0) / var1
    var1 = dig_P9 * pressure * pressure / 2147483648.0
    var2 = pressure * dig_P8 / 32768.0
    pressure = pressure + (var1 + var2 + dig_P7) / 16.0


  # Refine humidity
  humidity = t_fine - 76800.0
  humidity = (hum_raw - (dig_H4 * 64.0 + dig_H5 / 16384.8 * humidity)) * (dig_H2 / 65536.0 * (1.0 + dig_H6 / 67108864.0 * humidity * (1.0 + dig_H3 / 67108864.0 * humidity)))
  humidity = humidity * (1.0 - dig_H1 * humidity / 524288.0)
  if humidity > 100:
    humidity = 100
  elif humidity < 0:
    humidity = 0

  return temperature/100.0,pressure/100.0,humidity

while True:
 temperature,pressure,humidity = readBME280All()

 text_file = open("/var/www/html/weather.txt", "a")
 text_file.write(str(datetime.now().strftime('%F %H:%M ')))

 # correct for bme280's high temp readout
 text_file.write("%.2f " % (((temperature)*9/5)+32-4))
 text_file.write("%.2f " % ((pressure)/33.8638866667))
 text_file.write("%.2f\n" % humidity)
 text_file.close()
 time.sleep(60)


Sunday, August 21, 2016

A $30 Wireless Weather Monitor Using a Raspberry Pi Zero


My weekend project was a wireless ambient condition monitor for the home. I used an RPi Zero (yep, i got one by mail order), SSD1306 .96" OLED, micro-usb adapter, cheap nubby Edimax wifi adapter (i have two cheaper ones, $3 MT7601s, on order), BME280 sensor, $0.67 and $0.68 junction cover and box from Homeless Despot (makes a great Zero case, and there are inexpensive heavy-duty waterproof ones that can easily hold an RPi 3 for about $7!! I'll building a remote weather station over the next month), some scrap Lexan (can't see it, but i hot-glued the display onto the Lexan), a cheap 4GB Sandis, microsdhc, and a 'Y' cable w/GPIO female headers.

All in all, a lot of fun, and now I have another visual trinket for the guest room. It has already come in handy to help us cool the kitchen by monitoring lowered temps due to the use of shades (they make about a 5-degree difference).

Friday, August 19, 2016

Combat Raspbian Software Bloat

i hate software bloat - it's bad enough that the Evil Empire has caused so much misery on this planet with its Winblows software, but when GNU/Linux distros bloat it's really sad...

don't get me wrong: i like Raspbian... but the Noobs distro is just plain dumb, and with Raspbian it's feast or famine:

- either you get a bloated, soggy, sdhc-eating install with all kinds of crap and junk most users will NEVER need

or

- in the case of Jessie Lite, a bare-bones, not even wifi-friendly distro

well friends, fear no more! thanks to Andrew Vaughn's Raspbian I love you but you're too fat, you can have a nicely crafted, customized Jessie Lite with a single command line!

here's my crafted system (i did install vnc4server, GNU ddrescue and some python extras afterwards though):

sudo apt-get update && sudo apt-get install alacarte desktop-base fonts-dejavu fonts-sil-gentium-basic gksu gnome-icon-theme gnome-themes-standard-data gtk2-engines libgl1-mesa-dri libgles1-mesa libgles2-mesa libpangox-1.0-0 lightdm lxappearance lxappearance-obconf lxde lxde-common lxde-core lxde-icon-theme lxinput lxpanel menu-xdg pcmanfm raspberrypi-net-mods raspberrypi-ui-mods xcompmgr xdg-utils xinit xserver-xorg xserver-xorg-video-fbdev xserver-xorg-video-fbturbo gpicview leafpad lxrandr lxtask lxterminal openbox pi-package rc-gui xarchiver xpdf gstreamer1.0-alsa gstreamer1.0-libav gstreamer1.0-omx gstreamer1.0-plugins-bad gstreamer1.0-plugins-base gstreamer1.0-plugins-good gstreamer1.0-x policykit-1 raspberrypi-artwork rpi-update python-gpiozero python-picamera python-pifacecommon python-pifacedigitalio python-pip python-serial python-tk python3-serial raspi-gpio tree udisks python-pygame

btw, this was done on my latest addition to my stable of tiny GNU/Linux boxen - a used Raspberry Pi Model 2 B, which i snagged for a Jackson - bazinga! bargain time!

Sunday, August 14, 2016

Easy Backup of the Beaglebone Black

I just spent an entire morning installing and removing software, and configuring my new Beaglebone Black. Thank heavens I finally found a working wifi adapter - a MediaTek MT7601 (Ralink 7601) Controller!

We all know the drill:

- boot a new computer with a new system
- spend hours configuring it
- then put a backup plan in place and back up all your hard work

It used to be quite a chore to back up a system. However, thanks to Mr. Robert Nelson, Beaglebone guru and kernel master,  backing up and cloning your eMMC (configure internal disk) on your Beaglebone system is as easy as:

1. Take a FAT-formatted microsdhc and insert into the original Beaglebone.

2. Run a simple command to start a backup script:

sudo /opt/scripts/tools/eMMC/beaglebone-black-make-microSD-flasher-from-eMMC.sh

3. Shutdown.

4. Insert the sdhc into the target Beaglebone (or your original if you're doing a restore operation)

5. Power up the Beaglebone.

The Beaglebone will boot off the microsdhc, then shut down when done. It doesn't get any easier than that! Took me about 20 minutes to back up, then clone my backup Beaglebone Black (I have two).

Crafting a BME280 Ambient Condition Monitor


I have been having a lot of fun with my Beaglebone Black now that wifi is up and running smoothly (can't believe it took so long to get a good adapter!). One of the most recent acquisitions was a Bosche BME280 sensor - tiny, with readouts of temperature, barometric pressure, and humidity - i guess smartphones are getting smarter?

Well, thankfully I didn't have to shell out an outrageous amount of dinero for this sensor. You can get 'em for less than a Hamilton on-line, so I popped for a pair. I used Matt Hawkin's excellent bme280.py script as an accessible Python lib (simply drop it in the same folder as your script), and just used the function to get the data:

  from bme280 import readBME280All

the original script returns many digit accuracy - too many for the oled, so i trimmed the output, converted from Centigrade to Fahrenheit and hectopascals to inches of mercury:

return "%.2f degrees F" % (((temperature)*9/5)+32)
return "%.2f inches mercury" % ((pressure)/33.8638866667)
return "%.2f%% humidity" % humidity
 
I like the result and will use this sensor with some wifi-enabled Arduinos for inexpensive weather monitoring. I also have a couple wind sensors I haven't tried - that's for later! So for now, here's the script:

#!/usr/bin/env python
# bbssd.py version 0.6 - a simple system monitor for the
# Beaglebone Black GNU/Linux SBC
# kg4zqz.blogspot.com
# adapted from rmhull's wonderful ssd1306 Python lib
# crafted for the dual-color 128x96 OLED w/yellow top area
# 070916 - initial version ported from a version for the Raspberry Pi
#          shows date, wlan0 IP address, memory, and sd card usage
# 070916 - added Beagle splash screen, kernel version and serial #
# 071016 - added uptime, wifi sig strength, screen cleanup
# 072616 - added text wrap to uptime screen
# 081416 - added BME280 weather sensor data/readout
#
# note: it was a bear to get all the needed software libs for
# the Pillow install - must have libjpeg6-dev and associated zlib pkgs!

import os
import psutil
from lib_oled96 import ssd1306
from time import sleep
from datetime import datetime
from PIL import ImageFont, ImageDraw, Image
from smbus import SMBus       #  These are the only two variant lines !!
i2cbus = SMBus(2)             # NOTE: Beaglebone Green Wireless uses bus 2!
oled = ssd1306(i2cbus)

draw = oled.canvas

while True:

 # "draw" onto this canvas, then call display() to show on the OLED.
 draw = oled.canvas

# show SPLASH screen
# set font to 17 for yellow area splash title
 font = ImageFont.truetype('/home/debian/Downloads/ssd1306-master/FreeSans.ttf', 17)
 draw.text((1, 1), 'BEAGLEBONE', font=font, fill=1)
# put on the dawg, which is capital 'S' in the below font
 font = ImageFont.truetype('/home/debian/Downloads/ssd1306-master/Doggon.ttf', 50)

draw.text((1, 23), ' S', font=font, fill=1)

 # now show splash screen, then sleep, then clear for next screen
 oled.display()
 sleep(3)
 oled.cls()

 # set up, display overall stats screen
 # set font to 13 for yellow area
 font = ImageFont.truetype('/home/debian/Downloads/ssd1306-master/FreeSans.ttf', 13)

 # get, display date and time
 draw.text((1, 1), str(datetime.now().strftime('%a  %b  %d  %H:%M:%S')), font=font, fill=1)

 # reset font for four smaller lines
 font = ImageFont.truetype('FreeSans.ttf', 10)

 # get, return Linux kernel version
 def uname_r():
    k = os.popen('uname -r')
    rev = str(k.read())
    # strip out trailing chars for cleaner output
    return "KERNEL: %s" % rev.rstrip('\r\n')

  # display kernel version
 draw.text((1, 15),   uname_r(),  font=font, fill=1)

 # get, return wlan0's current IP address
 def wlan_ip():
    f = os.popen('ifconfig wlan0 | grep "inet\ addr" | cut -c 21-33')
    ip = str(f.read())
    # strip out trailing chars for cleaner output
    return "WIFI IP: %s" % ip.rstrip('\r\n')

 # display the IP address
 draw.text((1, 28),    wlan_ip(),  font=font, fill=1)

 # get amount of free memory
 def mem_usage():

    usage = psutil.virtual_memory()
    return "MEM USED: %s KB" % (int(str(usage.used)) / 1024)

 # display amount of free memory
 draw.text((1, 41),    mem_usage(),  font=font, fill=1)

 # get disk usage
 def disk_usage(dir):
    usage = psutil.disk_usage(dir)
    return "SD CARD USED: %.0f%%" % (usage.percent)
 # display disk usage
 draw.text((1, 53), disk_usage('/'),  font=font, fill=1)

 # now show the entire stats screen, then clear
 oled.display()
 sleep(5)
 oled.cls()

 # read bme280 data - limit 2-digit accuracy
 def get_temp():
  from bme280 import readBME280All
  temperature,pressure,humidity = readBME280All()
 # return "%sF" % str(((temperature)*9/5)+32)
  return "%.2f degrees F" % (((temperature)*9/5)+32)

 def get_pressure():
  from bme280 import readBME280All
  temperature,pressure,humidity = readBME280All()
 # return "%s hPa" % str(pressure)
  return "%.2f inches mercury" % ((pressure)/33.8638866667)

 def get_humidity():
  from bme280 import readBME280All
  temperature,pressure,humidity = readBME280All()
 # return "%s percent" % str(humidity)
  return "%.2f%% humidity" % humidity

 font = ImageFont.truetype('/home/debian/Downloads/ssd1306-master/FreeSans.ttf', 13)
 draw.text((1, 1), 'Ambient Conditions', font=font, fill=1)

 font = ImageFont.truetype('/home/debian/Downloads/ssd1306-master/FreeSans.ttf', 12)
 draw.text((1, 20),  get_temp(),  font=font, fill=1)
 draw.text((1, 35),  get_pressure(),  font=font, fill=1)
 draw.text((1, 50),  get_humidity(),  font=font, fill=1)

 oled.display()
 sleep(5)
 oled.cls()

 # begin series of LARGE stats
 # LARGE display - get wifi wlan0 signal strength
 def get_wifi():
    cmd = "iwconfig wlan0 | grep Signal | /usr/bin/awk '{print $4}' | /usr/bin/cut -d'=' -f2"
    strDbm = os.popen(cmd).read()
    dbm = int(strDbm)
    quality = 2 * (dbm + 100)
    if strDbm:
     return("{0} dbm = {1}%".format(dbm, quality))
    else:
     return("No Wifi")

 font = ImageFont.truetype('/home/debian/Downloads/ssd1306-master/FreeSans.ttf', 17)
 draw.text((1, 1), 'WIFI SIGNAL', font=font, fill=1)
 font = ImageFont.truetype('/home/debian/Downloads/ssd1306-master/FreeSans.ttf', 15)
 draw.text((1, 30),    get_wifi(),  font=font, fill=1)

 oled.display()
 sleep(3)
 oled.cls()

 # LARGE display - uptime
 def get_uptime():
    uptime = os.popen("uptime")
    ut = str(uptime.read())
    # strip out trailing chars for cleaner output
    return "%s" % ut.rstrip('\r\n')

 font = ImageFont.truetype('/home/debian/Downloads/ssd1306-master/FreeSans.ttf', 17)
 draw.text((1, 1),    '    UPTIME',  font=font, fill=1)

# now smaller font needed and wrap text to show info
 font = ImageFont.truetype('/home/debian/Downloads/ssd1306-master/FreeSans.ttf', 11)
 import textwrap
 lines = textwrap.wrap(get_uptime(), width=25)
 # what 'line' to start info
 y_text = 20
 w = 1 # we'll always start at left side of OLED
 for line in lines:
    width, height = font.getsize(line)
    draw.text((w, y_text), line, font=font, fill=1)
    y_text += height

 oled.display()
 sleep(4)
 oled.cls()

 # LARGE display - wlan0's IP address
 def wlan_lip():
    f = os.popen('ifconfig wlan0 | grep "inet\ addr" | cut -c 21-33')
    ip = str(f.read())
    # strip out trailing chars for cleaner output
    return "%s" % ip.rstrip('\r\n')

 font = ImageFont.truetype('/home/debian/Downloads/ssd1306-master/FreeSans.ttf', 17)

 draw.text((1, 1),   ' IP ADDRESS', font=font, fill=1)
 font = ImageFont.truetype('/home/debian/Downloads/ssd1306-master/FreeSans.ttf', 16)
 draw.text((1, 30),    wlan_lip(),  font=font, fill=1)

 oled.display()
 sleep(3)
 oled.cls()

 # LARGE display - amount of free memory
 def mem_usagel():
    usage = psutil.virtual_memory()
    return "%s KB" % (int(str(usage.used)) / 1024)

 font = ImageFont.truetype('/home/debian/Downloads/ssd1306-master/FreeSans.ttf', 17)

 draw.text((1, 1),   'MEM USED', font=font, fill=1)
 draw.text((1, 30),    mem_usagel(),  font=font, fill=1)

 oled.display()
 sleep(3)
 oled.cls()

 # LARGE display - Beaglebone's serial number
 def get_serial():
    serial = os.popen('/usr/local/bin/get_serial_no')
    snum = str(serial.read())
    # strip out trailing chars for cleaner output
    return "%s" % snum.rstrip('\r\n')

 font = ImageFont.truetype('/home/debian/Downloads/ssd1306-master/FreeSans.ttf', 17)
 draw.text((1, 1),    'SERIAL NBR',  font=font, fill=1)
 # now smaller font needed
 font = ImageFont.truetype('/home/debian/Downloads/ssd1306-master/FreeSans.ttf', 15)
 draw.text((1, 30),    get_serial(),  font=font, fill=1)

 oled.display()
 sleep(3)
 oled.cls()

 # get, return current local WX
 def do_wx():
    f = os.popen('/usr/local/bin/currentwx')
    wx = str(f.read())
    # strip out trailing chars for cleaner output
    return "%s" % wx.rstrip('\r\n')

 # display the WX
 font = ImageFont.truetype('/home/debian/Downloads/ssd1306-master/FreeSans.ttf', 13)
 draw.text((1, 1),    'CURRENT WEATHER:',  font=font, fill=1)
 font = ImageFont.truetype('/home/debian/Downloads/ssd1306-master/FreeSans.ttf', 12)
 draw.text((1, 15),    ' PINELLAS PARK, FL',  font=font, fill=1)
 draw.text((1, 41),    do_wx(),  font=font, fill=1)
 

oled.display()
sleep(3)
oled.cls()      # Oled still on, but screen contents now blacked out


Wifi That Actually Works for the Beaglebone Black

I like the Beaglebone and think the Beaglebone Green Wireless is one of the best small-form-factor GNU/Linux computers. So I thought it would be nice to try a Beaglebone Black.

Boy, was I wrong! The Beaglebone Black turned out to be one of the most frustrating computers I've run across in a long time: configuring wifi was a pain in the fucking ass. I tried at least four different wifi USB dongles (there is no on-board wifi), including one that was touted as actually working (rtl8192cu). Wasted an entire day and got that sour taste in the stomach thinking I had purchased a pig-in-the-poke.

Well, life is now good. I *finally* found one that works and holds a steady connection. It's from the folks at Logic Supply:

It is a MediaTek MT7601 (Ralink 7601).  It configured right away using connmanctl. The Media Tek folks even offer drivers for GNU/Linux! Of course, you don't have to install anything if you're using kernel 4.4.x - there's firmware and a loadable module included - works great!

My Beaglebone Black has now joined my stable of working SBCs and has been spared from the parts bin.

Saturday, August 13, 2016

A Simple Calculator for the Arduino

Here's a simple calculator for the Arduino. I recently acquired a cheap ($12) 320x240 TFT and wanted to learn how to program these microcontrollers. There are some amazing demos out there for these TFTs - look for mcufriend_kbv on the Arduino.cc forums - great stuff!

Here's the calculator - I got it working on my TFT (which uses an ILI9341) by swapping x/y coordinates in the code... for some reason the swap() function didn't work for me - or perhaps it was one needs restart the IDE between orientation changes on the TFT?

NOTE: This is a *simple* calculator. I'll be working on expanding and modifying the code at some point to make it into a reasonable calculator. Don't do your taxes using this calculator!

// calculator.ino
// originally by max:
// https://github.com/maxpromer/Arduino-Touch-Calculator
// hacked by willie
// 
#include <Adafruit_GFX.h>    // Core graphics library
#include <Adafruit_TFTLCD.h> // Hardware-specific library
#include <TouchScreen.h>

#define YP A3  // must be an analog pin, use "An" notation!
#define XM A2  // must be an analog pin, use "An" notation!
#define YM 9   // can be a digital pin
#define XP 8   // can be a digital pin

#define TS_MINX 150
#define TS_MINY 120
#define TS_MAXX 920
#define TS_MAXY 940

TouchScreen ts = TouchScreen(XP, YP, XM, YM, 300);

#define LCD_CS A3
#define LCD_CD A2
#define LCD_WR A1
#define LCD_RD A0
// optional
#define LCD_RESET A4

// Assign human-readable names to some common 16-bit color values:
#define BLACK   0x0000
#define BLUE    0x001F
#define RED     0xF800
#define GREEN   0x07E0
#define CYAN    0x07FF
#define MAGENTA 0xF81F
#define YELLOW  0xFFE0
#define WHITE   0xFFFF

#define MINPRESSURE 10
#define MAXPRESSURE 1000

Adafruit_TFTLCD tft(LCD_CS, LCD_CD, LCD_WR, LCD_RD, LCD_RESET);

// keypad array
String Key[4][4] = {
  { "7", "8", "9", "/" },
  { "4", "5", "6", "*" },
  { "1", "2", "3", "-" },
  { "C", "0", "=", "+" }
};

String N1, N2, ShowSC, opt;
bool updata=false;
float answers=-1;

void setup() {
  Serial.begin(9600);
  tft.reset();
  tft.begin(0x9341); // SDFP5408
  tft.setRotation(2); //portrait, power on top
  tft.fillScreen(BLACK);
 
  tft.fillRect(0, 80, 240, 240, WHITE);
  tft.drawFastHLine(0, 80, 240, BLACK);
  tft.drawFastHLine(0, 140, 240, BLACK);
  tft.drawFastHLine(0, 200, 240, BLACK);
  tft.drawFastHLine(0, 260, 240, BLACK);
  tft.drawFastHLine(0, 320-1, 240, BLACK);

  tft.drawFastVLine(0, 80, 240, BLACK);
  tft.drawFastVLine(60, 80, 240, BLACK);
  tft.drawFastVLine(120, 80, 240, BLACK);
  tft.drawFastVLine(180, 80, 240, BLACK);
  tft.drawFastVLine(240-1, 80, 240, BLACK);

  for (int y=0;y<4;y++) {
    for (int x=0;x<4;x++) {
      tft.setCursor(22 + (60*x), 100 + (60*y));
      tft.setTextSize(3);
      tft.setTextColor(BLACK);
      tft.println(Key[y][x]);
    }
  }
}

void loop() {
  TSPoint p = waitTouch();
 
  updata = false;
  for (int i1=0;i1<4;i1++) {
    for (int i2=0;i2<4;i2++) {
// change to swap x,y
//      if ((p.x>=240-((i1+1)*60)+1&&p.x<=240-(i1*60)-1)&&(p.y>=(i2*60)+1&&p.y<=((i2+1)*60)-1)) {
      if ((p.y>=240-((i1+1)*60)+1&&p.y<=240-(i1*60)-1)&&(p.x>=(i2*60)+1&&p.x<=((i2+1)*60)-1)) {
        if ((i1<=2&&i2<=2)||(i1==3&&i2==1)) {
          if (opt==0) {
            if (answers!=-1) answers = -1;
            N1 = N1 + Key[i1][i2];
            ShowSC = N1;
          } else {
            N2 = N2 + Key[i1][i2];
            ShowSC = opt + N2;
          }
        } else {
          if (Key[i1][i2]=="C") {
            N1 = N2 = "";
            opt = "";
            answers = 0;
            ShowSC = N1;
          } else if (i2==3) {
            if (N1=="") N1 = String(answers);
            opt = Key[i1][i2];
            ShowSC = Key[i1][i2];
          } else if (Key[i1][i2]=="=") {
            // perform calculation
            if (opt=="+") answers = N1.toInt() + N2.toInt();
            else if (opt=="-") answers = N1.toInt() - N2.toInt();
            else if (opt=="*") answers = N1.toInt() * N2.toInt();
            else if (opt=="/") answers = N1.toInt() / N2.toInt();
            N1 = N2 = opt = "";
            ShowSC = answers;
          }
        }
        updata = true;
      }
    }
  }
  if (updata) {
    tft.fillRect(0, 0, 240, 80, BLACK);
    tft.setCursor(10, 10);
    tft.setTextSize(3);
    tft.setTextColor(WHITE);
    tft.println(ShowSC);
  }
  delay(300);
}

// get x,y touch coordinates
TSPoint waitTouch() {
  TSPoint p;
  do {
    p = ts.getPoint();
    pinMode(XM, OUTPUT);
    pinMode(YP, OUTPUT);
  } while((p.z < MINPRESSURE )|| (p.z > MAXPRESSURE));
  p.x = map(p.x, TS_MINX, TS_MAXX, tft.width(), 0);
  p.y = map(p.y, TS_MINY, TS_MAXY, tft.height(), 0);
//  Serial.println('x'); Serial.println(p.x);
//  Serial.println('y'); Serial.println(p.y);
  return p;
}